Coroutines in C++/Boost (2)

Also see my previous article: Coroutines in C++/Boost.

C++ finally has a native implementation in C++20. The principal difference between coroutines and routines is that a coroutine enables explicit suspend and resume of its progress via additional operations by preserving execution state and thus provides an enhanced control flow (maintaining the execution context).

1. Asymmetric vs Symmetric

From boost:

An asymmetric coroutine knows its invoker, using a special operation to implicitly yield control specifically to its invoker.

By contrast, all symmetric coroutines are equivalent; one symmetric coroutine may pass control to any other symmetric coroutine. Because of this, a symmetric coroutine must specify the coroutine to which it intends to yield control.

So C++20 coroutines are asymmetric ones. A coroutine only knows its parent. With the dependency, symmetric coroutines can be chained, just like a normal function calls another one. No goto semantics as with a symmetric one.

C++23 generators are also asymmetric. They are resumed repeatedly to generate a series of return values.

2. Stackless vs Stackful

Again From boost:

In contrast to a stackless coroutine, a stackful coroutine can be suspended from within a nested stackframe. Execution resumes at exactly the same point in the code where it was suspended before.

With a stackless coroutine, only the top-level routine may be suspended. Any routine called by that top-level routine may not itself suspend. This prohibits providing suspend/resume operations in routines within a general-purpose library.

Well, these two are confusing. Tutorials and Blogs have different description. To make it simple, if there is await/yield definition, it’s stackless. Then if there is something called Fiber in the language, it’s stackful.

Fibers are just like threads, they can be suspended at any stackframe. While await/yield is used as a suspend point, a stackless coroutine can only suspend at exactly that point.

A stackless coroutine shares a default stack among all the coroutines, while a stackful coroutine assigns a separate stack to each coroutine. With stackless coroutine, the code is transformed into event handlers at compile time, and driven by an event engine at run time, i.e. the scheduler of stackless coroutine. Transferring control of CPU to a stackless coroutine is merely a function call with an argument pointing to its context. Conversely, transferring CPU control to a stackful coroutine requires a context switch.

Here’s a summary of how coroutine is implemented in most popular programming languages.

Language Stackful coroutines (Fibers) Stackless coroutines (await/yield)
Java (Y2023) Virtual threads in Java 21 n/a
C n/a n/a
C++ n/a (Y2020) co_await, co_yield, co_return in C++ 20
Python n/a (Y2015) async, await/yield in Python 3.5
C# n/a (Y2012) async, await/yield in C# 5.0
Javascript n/a (Y2017) async, await/yield in ES 2017
PHP (Y2021) Fiber in PHP 8.1 n/a
Go (Y2012) Goroutine in Go 1.0
(Y2020) asynchronously preemptible in 1.14
n/a
Objective-C n/a n/a
Swift n/a (Y2021) async, await/yield in Swift 5.5
Rust n/a (Y2019) async, await in Rust 1.39

Reference

Boost.Coroutine2
Fibers under the magnifying glass
Stackful Coroutine Made Fast

Keyboard Backlight Control on Lenovo Ideapad & Xiaoxin Models

Ever found the keyboard backlight annoying? It keeps turning on when booting Windows, and there is no configuration to disable it permanently in any Lenovo Utilities.

Just did some reverse engineering to find how to control keyboard backlight programmatically. The principal is simple, use \\.\EnergyDrv device exposed by Lenovo ACPI energy management driver. It is capable of controlling all keyboard backlight levels. Also other capabilities available 🙂 . See code:

Should built and run on any C99 compilers. Run with <app.exe> [0|1|2|3]. You can add it to task scheduler to disable keyboard backlight on startup.

Also checked other approaches. The usb/hid way does not work on an ideapad. The Keyboard_Core.dll hack also does not work, I cannot find the file in drivers.

Benchmark for Web Frameworks (2)

Actually a simple note to the previous article.

– C: libevent seems to give best performance, but also low level.
– C++: drogon has websocket support, but no sse. async.
– C++: poco is sync.
– C++: workflow is low level, hard to use. wfrest has convenient apis, sse support in trunk.
– C++: boost/beast has poor performance, and cannot utilize multi-core cpu.
– C++: oatpp is async, but complex framework.
– Better use high level languages like Java or Go if running a web application.

Using vcpkg for C++ Package Management

Verified on CentOS7 and Windows 10.

1. Install v2ray and run proxy

v2ray unblocks github access from mainland China. Install v2ray clients and set IE proxy _only_ on Windows, bootstrap.bat & vcpkg.exe picks it automatically.

2. Download vcpkg from github and bootstrap

Download from: https://github.com/microsoft/vcpkg/releases

Export vcpkg-2022.08.15 directory as ${VCPKG_ROOT}.

3. Install drogon framework for demo

The drogon framework is a high performance application framework, including client & server supports. vcpkg builds static(*.a) library by default, use x64-linux-dynamic for dynamic(*.so) library. The repo version requires g++-8 to build, install from CentOS SCL:

To build with g++-7, manually install boost-filesystem package in vcpkg, and edit ${VCPKG_ROOT}/ports/drogon/portfile.cmake and comment out:

On Windows, open the command line for Visual Studio develop environment.

If openssl build fails, run:

If other errors, try to update to recent github ports. In my case, libmariadb build failed, that have been fixed in master.

4. Export drogon framework

5. Add a demo program

Linux dynamic build is community supported, invoke cmake with:

Now build with make or Visual Studio.

6. Stick to a specific version

add a vcpkg.json file:

It sticks to drogon 1.8.0 and openssl 1.1.1n. ${VCPKG_ROOT} now required to be a git repository. In your project directory, install specific versions of libraries by running:

Run cmake:

Now ldd output shows openssl 1.1 (default build is 3.0):

The only difference is the existence of vcpkg.json file, when using versioning.

7. Binary caching

If you change the root path of vcpkg, better clean up the cache, or build may fail. It’s $HOME/.cache/vcpkg/archives under Linux, and %LOCALAPPDATA%\vcpkg\archives under Windows.

Coroutines in C++/Boost

Starting with 1.56, boost/asio provides asio::spawn() to work with coroutines. Just paste the sample code here, with minor modifications:

The Python in my previous article can be used to work with the code above. I also tried to write a TCP server with only boost::coroutines classes. select() is used, since I want the code to be platform independent. NOTE: with coroutines, we have only _one_ thread.

Basic Usage of Boost MultiIndex Containers

Just take a simple note here.
The Boost Multi-index Containers Library provides a class template named multi_index_container which enables the construction of containers maintaining one or more indices with different sorting and access semantics.

Output:

To use with pointer values, only limited change needed as highlighted:

Database Access Layer in C++

We have JDBC in Java… and SOCI in C++… Well, it’s not so easy as it should be. To build with cmake:

The documents seem outdated, many options do not work. Just managed to figure out from the *.cmake source files. You can also download the oracle instant client SDK, and re-arrange the directory structure for build.

Code snippet I extracted from its unit tests:

Updated Apr 20, 2015:

1. Under RHEL5/CentOS5, I got errors like:

It’s due to SELinux security feature. Simply workaround it with:

2. Oracle uses oraociei11.dll or libociei.so for client data. They are both large files(110+MB), since they support multiple languages. Instead, you can use oraociicus11.dll(30+MB) or libociicus.so(10-MB). These files contain only English support.

Qt4学习笔记 (7)

This is a repost from my previous Qt learning series, based on Qt 4.3.

    本篇说一下Qt对于脚本的支持, 即QtScript模块.

    Qt支持的脚本基于ECMAScript脚本语言, 这个东西又是javascript, jscript的基础. 所以, 一般只要学过javascript就基本会写Qt脚本了. 自此开始, Qt脚本现在就叫javascript.
    不过作为土人, javascript中有一个prototype的概念, 现在才知道. javascript本没有类的概念, 跟不用说是继承之类的了. 但是凭借prototype的特性, 我们可以实现类似C++中类, 以及类继承等一些特性.
    prototype是个什么概念? 因为这个单词实在表意不清, 导致我花了很多时间来理解这个. 每个javascript对象都有一个指向另一个对象的引用, 这就是它的prototype. 一个对象的prototype定义了这个对象可以进行的操作集. 用C++来类比的话, 这些操作集是一定是成员函数. 看下面的javascript代码:

    我们把Circle对象的prototype设置成Shape对象, 实际上就是把Shape对象的prototype赋给了Circle对象, 让Circle对象的初始操作集跟Circle对象是一样的. 之后我们又重载了area()函数, 当然我们还可以加入新的函数. 它对应的C++代码如下:

    所以, 我们看到了, 对于一个javascript对象来说, 它还包括了一个内部的prototype对象. 对于Qt要用C++来实现类似prototype的功能的话, 除了要写一个javascript中的对应类, 还要写这个类对应的prototype类. 这个东西很高级, 也很麻烦, 所以建议看官方文档: http://doc.trolltech.com/4.3/qtscript.html#making-use-of-prototype-based-inheritance

    下面我们来说一下一般怎样从Qt的C++代码中调用Qt的script代码. 假设我们要写一个dialog, 上面有一个QPushButton, 一个QLineEdit. 点击QPushButton的时候, 会弹出一个QMessageBox来显示消息.

a) 直接写Qt的C++代码的话, 只要用signal/slot就行了:

b) 现在我们要加入javascript 的支持. 要解决的大概有这么一些问题: javascript中怎么拿到QLineEdit里的字符串? javascript中怎么调用QMessage这个Qt的类? 我们还是先来看代码:

    我们先把整个javascript文件读进来, 加入一堆设置, 最后调用QScriptEngine::evaluate()函数来执行这段javascript. QScriptEngine这个类就相当于javascript的解释器.
    javascript里没有类这个概念, 所有的变量都是var类型. 如果要让Qt的C++类在javascript里运行, 那么先要将它包装(wrap)成一个javascript的类型. 代码的section 1部分把this(即当前的dialog)先做了包装, 然后把包装后的对象加入到javascript的运行环境的全局变量中.
    接着来解决QMessageBox的问题. 由于javascript中没有类, 继而也就是没构造函数这个概念, 但是当我们在javascript中new一个Qt C++对象的时候, 还是需要调用它的构造函数. 代码的section 2部分先把一个C++回调函数(之所以称为回调函数, 是因为要作为QScriptEngine::newFunction()的参数, signature是固定的)包装成一个QScriptValue, 然后把它和QMessageBox的meta-object信息一起包装成一个QScriptValue, 最后依样画葫芦地加入到javascript的运行环境的全局变量中. 这样我们就能在javascript中new出一个QMessageBox了.
    有一个很重要问题. 就是Qt的meta-object系统和javascript的调用系统是有对应关系的. 在javascript中, 一个var如果是QObject包装而来, 那么这个QObject的所有property(Q_PROPERTY声明), signal/slot都是可以在javascript中调用的. 还有就是这个QObject的所有child (指的是包含而不是继承关系), 也是可以直接访问的.
    看一下javascript代码. 其中greeting和text都是属性:

c) 我们实现了用javascript来控制逻辑. GUI的话, Qt也提供了一种可以直接读取*.ui的方法: QUiLoader::load()函数. 于是我们连GUI也可以不用直接编译到binary里去了. 我们要做的就是用Qt的C++代码搭一个大概的框架, 加载需要的*.ui, *.js文件, 在适当的时候调用适当的javascript函数就行了. 而且*.ui文件对于每个控件都会有一个objectName的属性, 用uic生成代码的话, 这个值就是变量名, 如果用QUiLoader::load()的话, 这个就被赋给了QObjectobjectName这个property. 当我们要在一个QWidget的javascript对象里引用它的子控件的时候, 便能直接用这个objectName来引用. 于是*.ui 和*.js文件可以说简直配合的天衣无缝那.
    还是来看代码, Qt的C++代码没什么好说的, 就看javascript代码:

    直接访问子控件是不是清爽多了? 呵呵. 代码见这里. 其它请参考官方文档:
*) http://doc.trolltech.com/4.3/ecmascript.html
*) http://doc.trolltech.com/4.3/qtscript.html

Qt4学习笔记 (6)

This is a repost from my previous Qt learning series, based on Qt 4.3.

    本篇继续介绍Qt的高级特性:

1. L&F Customization (自定义观感)

    这个东西也就是传说中的skining, 换皮肤(画皮? – -). 如果你用过mfc或者java来实现控件的换肤功能的话, 那你一定觉得那是最恐怖的事情, 简直是一张张的图片往上贴啊… Qt也可以这么做, 但是提供了2种更聪明方便的方法:
a) qss (Qt Style Sheet): 这个东西灵感来源于html的css (书上也的是”inspired by”, 我就直译啦). 也就是说用qss来控制观感, 逻辑什么的还是用C++代码. 然后我就不介绍啦, 看看官方文档吧: http://doc.trolltech.com/4.3/stylesheet-syntax.html
b) 子类化QStyle类: Qt把所有观感相关的数据都抽象到了QStyle或者它的子类中, 我们要支持一个新的L&F的话, 只要继承这个类或者其子类, 重载一些函数就可以了. 这个我也不详细说啦, 书上也几乎都是抄的官方文档: http://doc.trolltech.com/4.3/style-reference.html

2. 插件框架:

    我们来想一下, 对于插件一般的实现方法. 能想到的大概是这样. 写一堆dll, 这些dll都提供统一的export接口函数.
    Qt的做法做法是差不多的, 只是在中间又提供了一层跨平台的抽象(shared dll在各个平台的实现都是不一样的嘛) 以及精简接口. 用PE Explorer可以看到所有的Qt plugin都只export了2个函数: qt_plugin_instance(), qt_plugin_query_verification_data(), 不过这两个函数具体是怎么调用的还没survey过.
    Qt的plugin可以分为两类: Qt本身的plugin和自己写的application的plugin.
    Qt的plugin可以implement 已有的接口. 比如可以implement QStylePlugin接口把style作为plugin, 可以implement QImageIOPlugin接口扩展Qt可以识别的图片格式, 等等. 这个就不说了.
    Qt的plugin还可以implement自定义的接口. 下面说一下大概的步骤:

a) 首先定义一个interface的类, 定义virtual functions, 最后调用Q_DECLARE_INTERFACE宏. 一般的interface都会提供这样的结构, 一个keys()接口说明当前plugin可以创建哪些object, 然后是一个创建object的函数(这里我写的doSomething()是同样的意思). 代码如下:

b) Implement 这个interface, 以下分别是*.h文件和*.cpp文件:

    *.h中的Q_INTERFACES宏用来告诉Qt的meta system这个类implement了哪个接口. 而*.cpp中Q_EXPORT_PLUGIN2宏是用来export dll接口的, 放在所有类成员函数之外调用就行了.

c) 调用, Qt提供了一个QPluginLoader类专门用来load插件. 依据上面现有的代码, 我们可以如下调用:

    以上代码并不涉及具体的plugin的操作, 否则就不能叫做plugin了呵呵.
    官方文档: http://doc.trolltech.com/4.3/plugins-howto.html

Qt4学习笔记 (5)

This is a repost from my previous Qt learning series, based on Qt 4.3.

    本篇说一下Qt所谓的高级特性: i18n 的支持 (Internationalization).
    首先明确一点, Qt对于unicode的支持是相当好的, 用来表示字符串的QString保存的是16-bit的QChar(官方文档上这么写哦), 跟java的char是一样的. 但是但是..实际上QString的内部数据一点也没有用到QChar, 大概是为了performance的考虑不吧, 附一段源码(/src/corelib/tools/qstring.h):

    大概是这么个情况. 下面来说一下怎么样支持i18n.

a) 首先要做的就是把要翻译的string统统用tr()函数包起来(其实是QObject::tr()). 当然还有其它的方法, 不过这个最容易.

b) 编辑*.pro文件, 加入需要支持的语言信息. 比如我们要支持简体中文和日本语:

c) 运行lupdate来生成上面两个*.ts文件. lupdate会自动搜索需要翻译的字符串(用tr()函数包起来的作用):

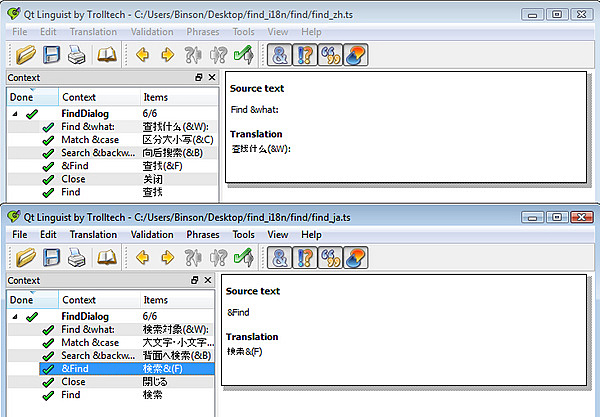
d) 用Qt linguist来编辑生成的两个文件, 当然如果你够nb.. 可以手动编辑… 截张图:
qt_5_1

e) 嗯.. 最好是全部都打勾了才好.. 工具栏上有检查选项, 通过了才打勾. 接着就是运行lrelease工具把*.ts文件转成binary的*.qm文件, 以便可以添加到Qt的resource文件(*.qrc) 中使用:

f) 新加一个*.qrc资源文件, 内容如下. 具体语法请查阅官方文档:

g) 然后就一切正常了:

h) 代码里大概可以这样写, 就是对QApplication对象设一个translation的属性类, 注释可以用来切换语言:

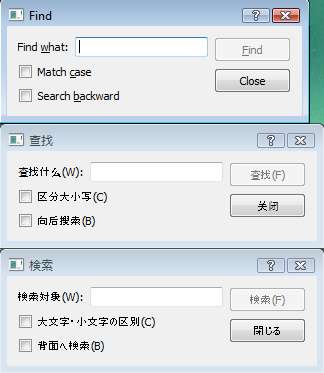
    还是截张图吧..三种语言…:
qt_5_2
    可以看到, Qt的layout又发挥作用了, 中文和日文的dialog相对长了一些.

    以上. 代码见这里.