Non-privileged ping Under Windows

Continue with last article, only paste code here:

IcmpSendEcho() is used to send ICMP messages which does not require administrator privilege. I summarize all cases in which raw socket, icmp api or system ping approach may fail:

raw socket icmp api system ping
Windows XP Administrator OK OK OK
User WSAEACCES in sendto() OK OK
Guest WSAEACCES in sendto() OK OK
Windows 7 Administrator WSAEACCES in socket() OK OK
User WSAEACCES in socket() OK OK
Guest WSAEACCES in socket() ERROR_ACCESS_DENIED in IcmpCreateFile() Unable to contact IP driver. General failure.
Run as Administrator OK OK OK

You may ask what’s the difference between “Administrator” and “Run as Administrator”, the answer comes from stackoverflow:

– When an user from the administrator group logs on, the user is allocated two tokens: a token with all privileges, and a token with reduced privileges. When that user creates a new process, the process is by default handed the reduced privilege token. So, although the user has administrator rights, she does not exercise them by default. This is a “Good Thing”.

– To exercise those rights the user must start the process with elevated rights. For example, by using the “Run as administrator” verb. When she does this, the full token is handed to the new process and the full range of rights can be exercised.
ping Using a Raw Socket

A ping utility is used to check the availability of a remote host. I wanted to implement the function in my project. But it is not so easy as I had expected. Since administrator/root privilege is required to create a raw socket under windows/linux, and this is not what I want.

Finally, I chose to utilize system’s ping via CreateProcess()/execve() function. Under windows, ping may used IcmpSendEcho() API to wrap the creation of a raw socket, and this does not require administrator privilege. But it is still not working when logged in as a guest. Under linux, ping is a +s(setuid) utility, which means it is always run with root privilege. Anyway, I still tried to implement ping by using raw socket and sending raw ICMP(Internet Control Message Protocol) messages.

A raw ICMP echo request message has a ICMP header, while a raw ICMP echo reply message has an additional IP header in front of the ICMP header. Say:

There are several ICMP message types defined in RFC 792, but we only care about the echo type. So here’s our definition of a IP header and a ICMP header:

Our customized ICMP echo request/reply definition with self-defined data field:

The raw socket is created with:

Sending a ICMP echo request:

We simply use the checksum algorithm found in the original ping program from Mike Muuss.

Now, receiving a ICMP echo reply:

You may have noticed the if/else clause in the receive function. The use_icmp_socket flag is used to tell which socket type is used when sending a ICMP message. In linux kernel 3.0, a new socket type is introduced to reduce the possibility to use a raw socket that only send ICMP echo messages. Thus, the classic ping utility can be no longer a +s(setuid) one. A ICMP socket can be created with:

Note the difference in the second parameter. A kernel parameter(/proc/sys/net/ipv4/ping_group_range) in comment above should be set to indicate which UID range is allowed to use a ICMP socket.

When using a raw socket, the TTL value is in the IP header. While, the TTL value is in the socket ancillary data when using a ICMP socket, the reply data does not contain IP header any more. And we must set a socket option explicitly to retrieve the TTL value:

Let’s put them all together:

All code compiles and works under Ubuntu 12.04(gcc4.6), Windows XP(VS2005) and Windows 7(VS2010) with administrator/root privilege. After enabling the ICMP socket parameter, root privilege is not required under linux. The output may look like:

Reference:
– RFC 791: http://tools.ietf.org/html/rfc791
– RFC 792: http://tools.ietf.org/html/rfc792
– Implement ping in C: http://www.ibm.com/developerworks/cn/linux/network/ping/
– Raw Socket and ICMP: http://courses.cs.vt.edu/cs4254/fall04/slides/raw_6.pdf
– Linux Kernel 3.0: http://kernelnewbies.org/Linux_3.0
– IPv4: Add ICMP Socket Kind: http://lwn.net/Articles/420800/
– Patch for Userspace ping: ftp://ftp.intelib.org/pub/segoon/iputils-ss020927-pingsock.diff
– Wine Implementation: http://fossies.org/dox/wine-1.4.1/icmp_8c_source.html

Logging in Multithreaded Environment Using Thread-Local Storage

Generally, A logger is a singleton class. The declaration may look like:

The Init function is used to set log name or maybe other configuration information. And We can use the Write function to write logs.

Well, in a multithreaded environment, locks must be added to prevent concurrent issues and keep the output log in order. And sometimes we want to have separate log configurations. How can we implement it without breaking the original interfaces?

One easy way is to maintain a list of all available Logger instances, so that we can find and use a unique Logger in each thread. The approach is somehow like the one used in log4j. But log4j reads configuration files to initialize loggers, while our configuration information is set in runtime.

Another big issue is that we must add a new parameter to the GetInstance function to tell our class which Logger to return. The change breaks interfaces.

By utilizing TLS (thread-local storage), we can easily solve the above issues. Every logger will be thread-local, say every thread has its own logger instance which is stored in its thread context. Here comes the declaration for our new Logger class, boost::thread_specific_ptr from boost library is used to simplify our TLS operations:

Simply use boost::thread_specific_ptr to wrap the original 2 static variables, and they will be in TLS automatically, that’s all. The implementation:

Our test code:

Output when using the original Logger may look like:

When using the TLS version, it may look like:

Everything is in order now. You may want to know what OS API boost uses to achieve TLS. I’ll show you the details in boost 1.43:

The underlying API is TlsGetValue under windows and pthread_getspecific under *nix platforms.

CDT Indexer Change History in Eclipse

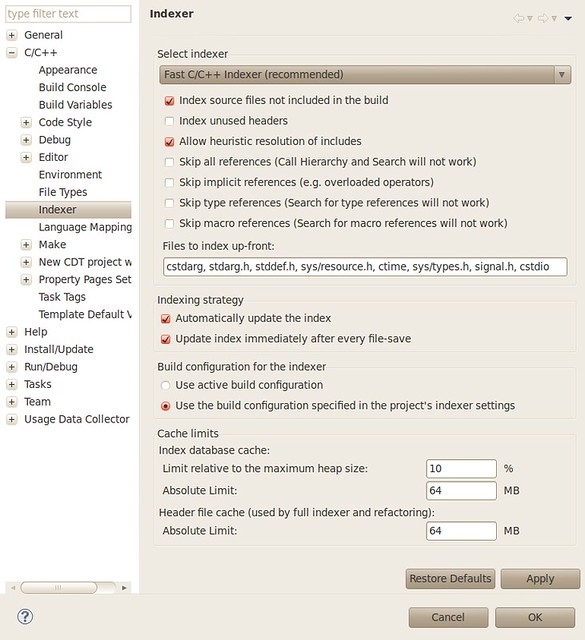
First, here’s the original indexer preference page of eclipse 3.5 (CDT 6.0):

eclipse35_cdt60

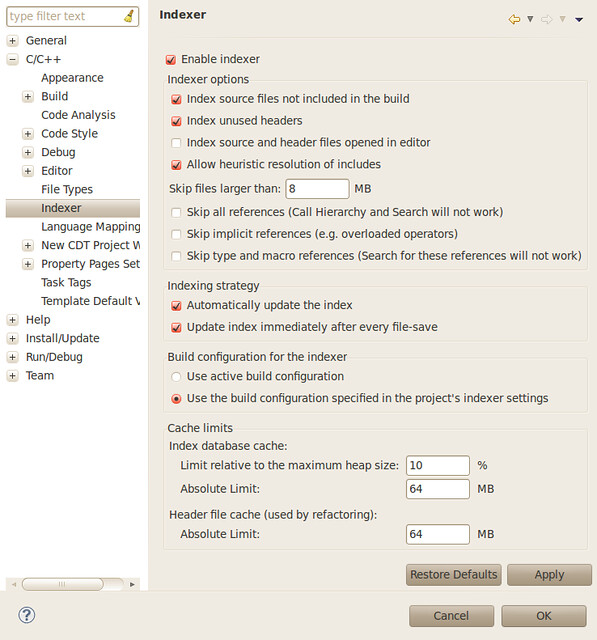
In eclipse 3.6 (CDT 7.0), the full indexer is removed in favour of the fast indexer.

eclipse36_cdt70

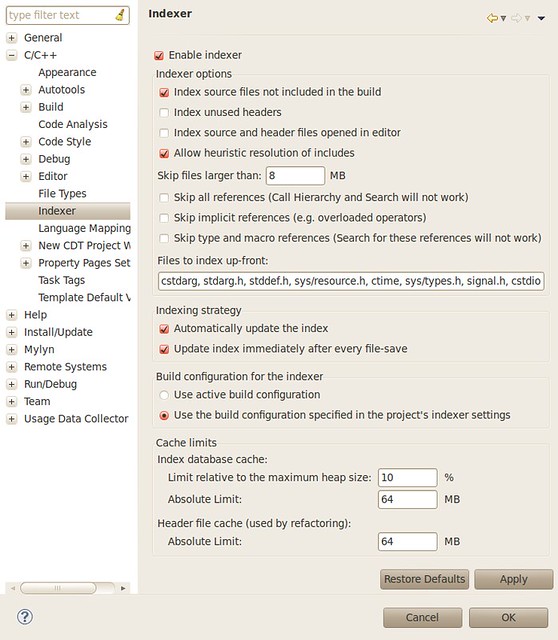
And in eclipse 3.7 (CDT 8.0), there seems to be no big changes, “Index source and header files opened in editor) is added and set to false by default:

eclipse37_cdt80

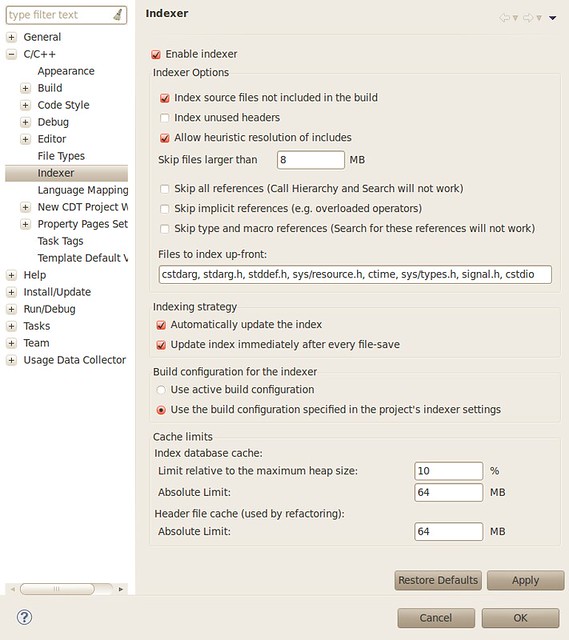
Now, here’s the indexer preference page of eclipse 3.8/4.2 (CDT 8.1). Two changes: 1) Bug 197989 – Headers included in different variants are not supported. 2) Bug 377992 – Enable the “Index unused headers” preference by default. In addition, option to parse files up-front from UI is removed.

eclipse38_cdt81

I just want to read source code of apr and glib, to learn from them. When I created a C project and imported all files into it, some symbols were unresolved or wrongly resolved. In eclipse 3.7/3.8 (CDT 8.0/8.1), I managed to work it out by importing only unix-specific source files.

There’s a performance issue in eclipse Juno 4.2, but Juno 3.8 is not affected. So I strongly suggest to use 3.8 version. Since there’s no all-in-one package for 3.8. It is suggested to download the platform package (not the huge SDK package), and install CDT online.

Using CIMPLE with OpenPegasus CIM Server

This post just walk through the usage of CIMPLE and OpenPegasus in CentOS 5.x. For background knowledge, please refer to wikipedia.

In CentOS 5.x, just install OpenPegasus(2.9.1) from yum:

We install the devel package since CIMPLE needs to build against it. I used CIMPLE 1.2.4. Before build it, we should fix broken symbolic links of OpenPegasus package, otherwise link error occurs:

There’s also a trivial bug which prevent CIMPLE from generating CMPI version of makefiles. Edit ${CIMPLE}/src/tools/genmak/main.cpp, find line “case ‘c'”, and change to “case ‘C'”. Now configure and make:

Aha!! Another annoying bug: wrong permissions in *.tar.gz source package. Fix with:

Demo code refers to CIMPLE official tutorial. It can be found in source package. A repository.mof file is created first:

Run genproj to generate class files, provider files, and module files:

Generate makefiles using genmak. First line is for OpenPegasus adapter, while second line for CMPI adapter:

We implemented President::get_instance() and President::enum_instance() in our code:

If get_instance() returns GET_INSTANCE_UNSUPPORTED, the adapter satisfies the request by calling enum_instances() and searching for a matching instances. It is recommend to leave get_instance() unsupported when the total number of instances is small.

After making your module, a registration is required for OpenPegasus CIM server. Start your server and register. The shared library should also be copied to OpenPegasus’s providers folder manually:

To unregister this provider, run:

You may want to dump MOF registration instance for your provide:

Install command line utilities and test OpenPegasus server:

Test our President provider:

All code can be found in my skydrive here:

Smart Pointers in C++0x and Boost (2)

1. Environment

– windows xp
– gcc-4.4
– boost-1.43

2. auto_ptr

A smart pointer is an abstract data type that simulates a pointer while providing additional features, such as automatic garbage collection or bounds checking. There’s auto_ptr in C++03 library for general use. But it’s not so easy to deal with it. You may encounter pitfalls or limitations. The main drawback of auto_ptr is that it has the transfer-of-ownership semantic. I just walk through it. Please read comments in code carefully:

3. unique_ptr

To resolve the drawbacks, C++0x deprecates usage of auto_ptr, and unique_ptr is the replacement. unique_ptr makes use of a new C++ langauge feature called rvalue reference which is similar to our current (left) reference (&), but spelled (&&). GCC implemented this feature in 4.3, but unique_ptr is only available begin from 4.4.

What is rvalue?

rvalues are temporaries that evaporate at the end of the full-expression in which they live (“at the semicolon”). For example, 1729, x + y, std::string(“meow”), and x++ are all rvalues.

While, lvalues name objects that persist beyond a single expression. For example, obj, *ptr, ptr[index], and ++x are all lvalues.

NOTE: It’s important to remember: lvalueness versus rvalueness is a property of expressions, not of objects.

We may have another whole post to address the rvalue feature. Now, let’s take a look of the basic usage. Please carefully reading the comments:

One can ONLY make a copy of an rvalue unique_ptr. This confirms no ownership issues occur like that of auto_ptr. Since temporary values cannot be referenced after the current expression, it is impossible for two unique_ptr to refer to a same pointer. You may also noticed the move function. We will also discuss it in a later post.

Some more snippet:

unique_ptr can hold pointers to an array. unique_ptr defines deleters to free memory of its internal pointer. There are pre-defined default_deleter using delete and delete[](array) for general deallocation. You can also define your customized ones. In addition, a void type can be used.

NOTE: To compile the code, you must specify the -std=c++0x flag.

4. shared_ptr

A shared_ptr is used to represent shared ownership; that is, when two pieces of code needs access to some data but neither has exclusive ownership (in the sense of being responsible for destroying the object). A shared_ptr is a kind of counted pointer where the object pointed to is deleted when the use count goes to zero.

Following snippet shows the use count changes when using shared_ptr. The use count changes from 0 to 3, then changes back to 0:

Snippets showing pointer type conversion:

The void type can be used directly without a custom deleter, which is required in unique_ptr. Actually, shared_ptr has already save the exact type info in its constructor. Refer to source code for details :). And static_pointer_cast function is used to convert between pointer types.

Unlike auto_ptr, Since shared_ptr can be shared, it can be used in STL containers:

NOTE: shared_ptr is available in both TR1 and Boost library. You can use either of them, for their interfaces are compatible. In addition, there are dual C++0x and TR1 implementation. The TR1 implementation is considered relatively stable, so is unlikely to change unless bug fixes require it.

5. weak_ptr

weak_ptr objects are used for breaking cycles in data structures. See snippet:

If we use uncomment to use shared_ptr, head is not freed since there still one reference to it when exiting the function. By using weak_ptr, this code works fine.

6. scoped_ptr

scoped_ptr template is a simple solution for simple needs. It supplies a basic “resource acquisition is initialization” facility, without shared-ownership or transfer-of-ownership semantics.

This class is only available in Boost. Since unique_ptr is already there in C++0x, this class may be thought as redundant. Snippet is also simple:

Complete and updated code can be found on google code host here. I use conditional compilation to swith usage between TR1 and Boost implementation in code. Hope you find it useful.

Smart Pointers in C++0x and Boost

Let clarify some concepts first. What is C++0x? Wikipedia gives some overview here:

C++0x is intended to replace the existing C++ standard, ISO/IEC 14882, which was published in 1998 and updated in 2003. These predecessors are informally but commonly known as C++98 and C++03. The new standard will include several additions to the core language and will extend the C++ standard library, incorporating most of the C++ Technical Report 1 (TR1) libraries — with the exception of the library of mathematical special functions.

Then why it is called C++0x? As Bjarne Stroustrup addressed here:

The aim is for the ‘x’ in C++0x to become ‘9’: C++09, rather than (say) C++0xA (hexadecimal :-).

You may also noticed TR1, also refer here in Wikipedia:

C++ Technical Report 1 (TR1) is the common name for ISO/IEC TR 19768, C++ Library Extensions, which is a document proposing additions to the C++ standard library. The additions include regular expressions, smart pointers, hash tables, and random number generators. TR1 is not a standard itself, but rather a draft document. However, most of its proposals are likely to become part of the next official standard.

You got the relationship? C++0x is the standard adding features to both language and standard library. A large set of TR1 libraries and some additional libraries. For instance, unique_ptr is not defined in TR1, but is included in C++0x.

As of 12 August 2011, the C++0x specification has been approved by the ISO.

Another notable concept is the Boost library. It can be regarded as a portable, easy-to-use extension to the current C++03 standard library. And some libraries like smart pointers, regular expressions have already been included in TR1. You can find license headers regarding the donation of the boost code in libstdc++ source files. While in TR2, some more boost code are to be involved.

TR1 libraries can be accessed using std::tr1 namespace. More info on Wikipedia here:

Various full and partial implementations of TR1 are currently available using the namespace std::tr1. For C++0x they will be moved to namespace std. However, as TR1 features are brought into the C++0x standard library, they are upgraded where appropriate with C++0x language features that were not available in the initial TR1 version. Also, they may be enhanced with features that were possible under C++03, but were not part of the original TR1 specification.

The committee intends to create a second technical report (called TR2) after the standardization of C++0x is complete. Library proposals which are not ready in time for C++0x will be put into TR2 or further technical reports.

The article seems to be a bit too long so far, I decide to give my snippets in a later post.

Retrieve BIOS Info Programmatically in Linux

Generally, BIOS info can be found by dmidecode utility(run as root), like:

Here, I retrieve it by using libhd library provided in hwinfo utility:

Debug Qt Libraries with Ubuntu Debug Packages

In previous articles, I was not able to use Qt’s debug package provided by Ubuntu. Now, I will explain how to use them.

Our simple application:

Our *.pro file, you should enable the debug build:

1. Build your debug version of application:

2. Install Qt’s debug package:

3. Install the Qt source:

Now you can start debugging your application. Since Qt’s debug symbols are installed in /usr/lib, It does not follow the GDB’s global debug directory described here. We should tell GDB to load these symbols manually:

We set a breakpoint at the beginning of main function to load all shared libraries. Next, we will load symbols for libQtCore.so.4. The symbol will be loaded in the start address of it (0xb7652510):

Now, you are able to step into the Qt library, but no source is attached:

Source files are attached by:

See the source and backtrace? 🙂

OO Impelementation in C++

From the last series of GObject library, we know the approach of OOP using C. Now, I just want to have a comparison of OO implementation in all leading programming languages: C, C++, Java and C#. I will use C++/Qt in this article. Apart from basic features like encapsulation, inheritance, polymorphism, I will demonstrate how to use advanced features including properties, meta info and event-driven programming.

Now, let’s start. Since C++ supports inheritance and polymorphism in language level. They are not the problem. When encounter encapsulation, it does not do well. We CAN declare member variables as private to prohibit their directly access. But the internal implementation is still exposed. When adding/removing private member variables, the class structure is changed. This can cause binary compatible issues. According to the guide of Qt, we define a private class to hold all private member variables, and add the pointer of it to our public class. The size of pointer is constant in all platforms, so this will not break the binary compatibility. Here’s the code:

NOTE: To use Qt’s object mechanism, your class should inherit QObject class and include the Q_OBJECT macro.

Just note the forward declaration of QBasePrivate private class. It is define in *.c file, and cannot be used by client applications. We defined a d_ptr protected member variable of this type to hold all private data values. Qt library provideds a series of easy-to-use macros to support this scheme to implementation:

Qt library supports properties and meta info. properties are defined with Q_PROPERTYmacro, while class meta info are defined with Q_CLASSINFO. Both of them can be inherited by derived classes. Last is Qt’s event-driven mechanism: signals/slots. Since they are also based on QObject, we had to define a test class to include all slots:

Test code:

All source code is available in my skydrive: http://cid-481cbe104492a3af.office.live.com/browse.aspx/share/dev/TestOO. In the TestQObject-{date}.zip file.