Finally switched from Ubuntu to Linuxmint after the 14.04 release. The distribution installed so many packages that I would never use, and the Unity desktop rendered slow on my old thinkpad 🙁
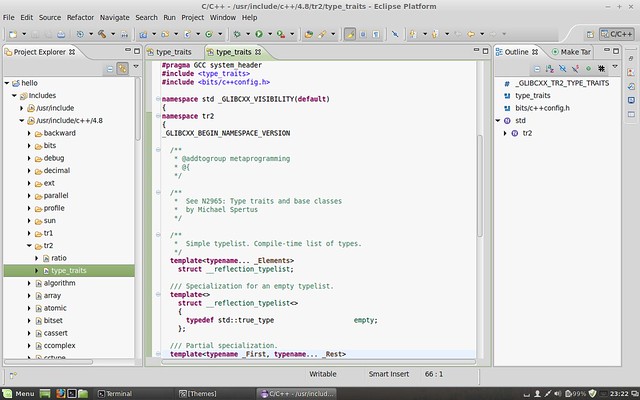
After trying Linuxmint 17 in VirtualBox, I found the color of its default theme is not so good. The mixture of grey and light green, sometimes made it a bit hard to detect borders. It also made me feel comfortless when using eclipse:
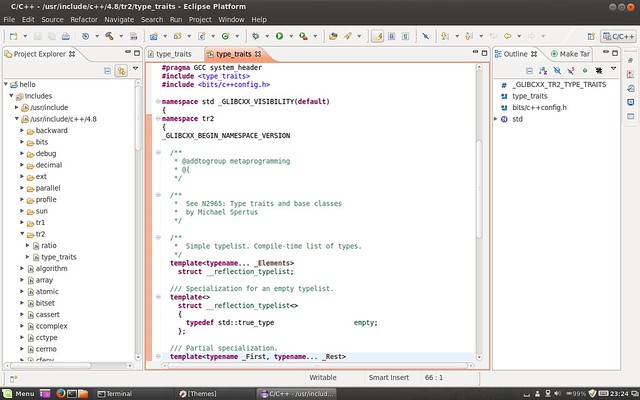
So I managed to reuse the default theme of Ubuntu within the cinnamon desktop from Linuxmint:
Here’s what I did:
1
# sudo apt-get install light-themes
This installs the Ubuntu themes. Now edit the theme to add support for Nemo:
1
2
# cd /usr/share/themes/Ambiance/gtk-3.0/
# sudo vi gtk-main.css
Add one line to the end of the file:
CSS
1
@import url("apps/nemo.css");
Create the new nemo.css file:
1
2
# sudo cp apps/nautilus.css apps/nemo.css
# sudo vi apps/nemo.css
Replace all “nautilus” with “nemo”, “Nautilus” with “Nemo”:
1
2
:%s/nautilus/nemo/g
:%s/Nautilus/Nemo/g
Updated Aug 14: Alternative color in Nemo is not available. It seems to be a bug(LP#945430) in the ubuntu theme.
Now open your “Themes” configuration, go to “Other settings” tab. Set “Controls” to “Ambiance”, set “Icons” to “ubuntu-mono-dark”, set “Window borders” to “Ambiance”.
Continue with Updating Kernel in Lucid, I want to decrease overview build time this time. My benchmark is run in Ubuntu 10.04 installed in Virtualbox. My CPU is i5-2540M at 2.6GHz.
I’m learning kernel code these days. A minimal kernel will save a lot of build time. As you see, it took 64min to build 2772 modules when running oldconfig target:
Build Time
Build Modules
Package Size
oldconfig
64min
2772
33MB
localmodconfig
16min
244
7MB
localmodconfig + ccache 1st time
19min
244
7MB
localmodconfig + ccache 2nd time
7min
244
7MB
Fortunately, a new build target localmodconfig was added in kernel 2.6.32 that just helps:
It runs “lsmod” to find all the modules loaded on the current running system. It will read all the Makefiles to map which CONFIG enables a module. It will read the Kconfig files to find the dependencies and selects that may be needed to support a CONFIG. Finally, it reads the .config file and removes any module “=m” that is not needed to enable the currently loaded modules. With this tool, you can strip a distro .config of all the unuseful drivers that are not needed in our machine, and it will take much less time to build the kernel.
The build time was dramatically decreased to 16min to build only 244 modules. It could still boot my VM to desktop, and everything was working fine. However, it failed to mount an *.iso file, since the module was not in lsmod when building I think. To use localmodconfig target, run:
1
# yes '' | make localmodconfig
It may end up with errors. Please ignore, a new .config file is already generated. Then remember to turn off the CONFIG_DEBUG_KERNEL option in the .config file, as mentioned in my previous article.
Then ccache is used. I downloaded the source code and built myself, since the 3.x version seems to be faster than 2.4.x version:
Default prefix(/usr/local) is used here. Last 2 lines created symbolic links(named as the compiler) to ccache, to let ccache masquerade as the compiler. This is suggested in ccache’s man page.
So why bother a compiler cache? The makefile doesn’t work?
If you ever run “make clean; make” then you can probably benefit from ccache. It is very common for developers to do a clean build of a project for a whole host of reasons, and this throws away all the information from your previous compiles. By using ccache you can get exactly the same effect as “make clean; make” but much faster. Compiler output is kept in $HOME/.ccache, by default.
The first run creates the cache, and the second benefits from the cache. That’s it.
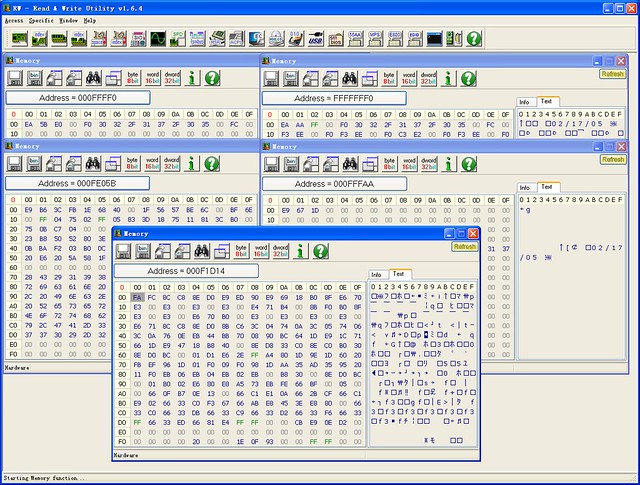
The first instruction that is fetched and executed following a hardware reset is located at physical address FFFFFFF0H. This address is 16 bytes below the processor’s uppermost physical address. The EPROM containing the software-initialization code must be located at this address.
The address FFFFFFF0H is beyond the 1-MByte addressable range of the processor while in real-address mode. The processor is initialized to this starting address as follows. The CS register has two parts: the visible segment selector part and the hidden base address part. In real-address mode, the base address is normally formed by shifting the 16-bit segment selector value 4 bits to the left to produce a 20-bit base address. However, during a hardware reset, the segment selector in the CS register is loaded with F000H and the base address is loaded with FFFF0000H. The starting address is thus formed by adding the base address to the value in the EIP register (that is, FFFF0000 + FFF0H = FFFFFFF0H).
The first time the CS register is loaded with a new value after a hardware reset, the processor will follow the normal rule for address translation in real-address mode(that is, [CS base address = CS segment selector * 16]). To insure that the base address in the CS register remains unchanged until the EPROM based software-initialization code is completed, the code must not contain a far jump or far call or allow an interrupt to occur (which would cause the CS selector value to be changed).
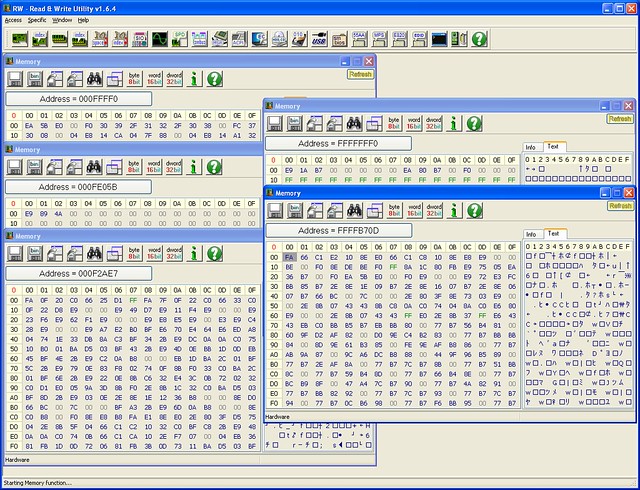
Two screenshots showing instructions in address FFFFFFF0H and FFFF0H(Shadow BIOS, see below) and their jumps. The first one is showing a AMI BIOS, while the second Phoenix BIOS. High BIOS of AMI directly jumps to the shadowed one, and both high and shadowed one jump to the same address. But High BIOS of Phoenix just keeps running in high addresses. The first instruction of both BIOS after all jumps is FAh, say cli(disable interrupts). I’m not going to do more reverse engineering. 🙂
NOTE: Main memory is not initialized yet at this time. From here:
The motherboard ensures that the instruction at the reset vector is a jump to the memory location mapped to the BIOS entry point. This jump implicitly clears the hidden base address present at power up. All of these memory locations have the right contents needed by the CPU thanks to the memory map kept by the chipset. They are all mapped to flash memory containing the BIOS since at this point the RAM modules have random crap in them.
The reset vector is simply FFFFFFF0h. Now, POST is started as described here:
POST stands for Power On Self Test. It’s a series of individual functions or routines that perform various initialization and tests of the computers hardware. BIOS starts with a series of tests of the motherboard hardware. The CPU, math coprocessor, timer IC’s, DMA controllers, and IRQ controllers. The order in which these tests are performed varies from motherboard to motherboard. Next, the BIOS will look for the presence of video ROM between memory locations C000:000h and C780:000h. If a video BIOS is found, It’s contents will be tested with a checksum test. If this test is successful, the BIOS will initialize the video adapter. It will pass controller to the video BIOS, which will inturn initialize itself and then assume controller once it’s complete. At this point, you should see things like a manufacturers logo from the video card manufacturer video card description or the video card BIOS information. Next, the BIOS will scan memory from C800:000h to DF800:000h in 2KB increments. It’s searching for any other ROM’s that might be installed in the computer, such as network adapter cards or SCSI adapter cards. If a adapter ROM is found, it’s contents are tested with a checksum test. If the tests pass, the card is initialized. Controller will be passed to each ROM for initialization then the system BIOS will resume controller after each BIOS found is done initializing. If these tests fail, you should see a error message displayed telling you “XXXX ROM Error”. The XXXX indicates the segment address where the faulty ROM was detected. Next, BIOS will begin checking memory at 0000:0472h. This address contains a flag which will tell the BIOS if the system is booting from a cold boot or warm boot. A value of 1234h at this address tells the BIOS that the system was started from a warm boot. This signature value appears in Intel little endian format, that is, the least significant byte comes first, they appear in memory as the sequence 3412. In the event of a warm boot, the BIOS will will skip the POST routines remaining. If a cold start is indicated, the remaining POST routines will be run.
NOTE: Main memory is initialized in POST. Main part of memory initialization code is complicated, and is directly provided by Intel which is known as MRC(Memory Reference Code).
Shadowing refers to the technique of copying BIOS code from slow ROM chips into faster RAM chips during boot-up so that any access to BIOS routines will be faster. DOS and other operating systems may access BIOS routines frequently. System performance is greatly improved if the BIOS is accessed from RAM rather than from a slower ROM chip.
A DRAM control register PAM0(Programmable Attribute Map) makes it possible to independently redirect reads and writes in the BIOS ROM area to main memory. The idea is to allow for RAM shadowing which allows read-access for ROMs to come from main memory whereas writes will continue to go to ROMs. Refer to Intel’s MCH datasheet for details:
This register controls the read, write, and shadowing attributes of the BIOS area from 0F0000h–0FFFFFh. The (G)MCH allows programmable memory attributes on 13 Legacy memory segments of various sizes in the 768 KB to 1 MB address range. Seven Programmable Attribute Map (PAM) Registers are used to support these features. Cacheability of these areas is controlled via the MTRR registers in the processor.
Big real mode(or unreal mode) is used to address more memory beyond 1M, as BIOS ROMs becomes larger and larger. In big real mode, one or more data segment registers have been loaded with 32-bit addresses and limits, but code segment stays unchanged:
Real Mode
Big Real Mode
Protected Mode
Code segment(cs)
1M
1M
4G
Data segments(ds, es, fs, gs)
1M
4G
4G
Protected mode can also refer 4G memory. But BIOS is mainly written for real mode, big real mode is a better choice for addressing.
Then, BIOS continues to find a bootable device, see wikipedia:
The BIOS selects candidate boot devices using information collected by POST and configuration information from EEPROM, CMOS RAM or, in the earliest PCs, DIP switches. Option ROMs may also influence or supplant the boot process defined by the motherboard BIOS ROM. The BIOS checks each device in order to see if it is bootable. For a disk drive or a device that logically emulates a disk drive, such as a USB Flash drive or perhaps a tape drive, to perform this check the BIOS attempts to load the first sector (boot sector) from the disk to address 7C00 hexadecimal, and checks for the boot sector signature 0x55 0xAA in the last two bytes of the sector. If the sector cannot be read (due to a missing or blank disk, or due to a hardware failure), or if the sector does not end with the boot signature, the BIOS considers the disk unbootable and proceeds to check the next device. Another device such as a network adapter attempts booting by a procedure that is defined by its option ROM (or the equivalent integrated into the motherboard BIOS ROM). The BIOS proceeds to test each device sequentially until a bootable device is found, at which time the BIOS transfers control to the loaded sector with a jump instruction to its first byte at address 7C00 hexadecimal (1 KiB below the 32 KiB mark).
After all of above, BIOS initialization is finished. It’s your turn to take control of your system from address 0000:7c00!!
Why this address? It’s not defined by Intel nor Microsoft. It was decided by IBM PC 5150 BIOS developer team(David Bradley). See here:
BIOS developer team decided 0x7C00 because:
– They wanted to leave as much room as possible for the OS to load itself within the 32KB.
– 8086/8088 used 0x0 – 0x3FF for interrupts vector, and BIOS data area was after it.
– The boot sector was 512 bytes, and stack/data area for boot program needed more 512 bytes.
– So, 0x7C00, the last 1024B of 32KB was chosen.
Ubuntu Lucid(10.04) originally ships with 2.6.32 kernel. But on my T420 thinkpad, the wireless card is not recognized and graphics card is not functional well. Then I switched to 2.6.38 backport kernel, and installed bumblebee package to utilize the Nvidia Optimus Technology. Now the 3.0.0-16 backport kernel is out, it contains the fix for “rework ASPM disable code”, and it should do a better job in power saving even using the discrete Nvidia card. Moreover, it’s the new LTS kernel, so I decided to update to the 3.0 kernel. Please follow the steps if you are interested:
These commands install official nvidia driver. Currently, it’s the 295.20 version.
2. Enable Nvidia Driver
1
# sudo update-alternatives --config gl_conf
This will let you to choose opengl engines. Select nvidia over mesa. This will also enable nvidia Xorg drivers, blacklist nouveau driver and add nvidia-xconfig into /usr/bin. You may find warnings like:
1
2
update-alternatives: warning: skip creation of /usr/lib32/vdpau/libvdpau_nvidia.so.1 because associated file /usr/lib32/nvidia-current/vdpau/libvdpau_nvidia.so.1 (of link group gl_conf) doesn't exist.
update-alternatives: warning: skip creation of /usr/lib32/libvdpau_nvidia.so because associated file /usr/lib32/nvidia-current/vdpau/libvdpau_nvidia.so (of link group gl_conf) doesn't exist.
Just ignore them, seems to be safe.
1
# sudo nvidia-xconfig
This will generate new /etc/X11/xorg.conf file for your Nvidia card. If you cannot find the command, the original location is: /usr/lib/nvidia-current/bin/nvidia-xconfig
3. Fix ld Bindings
1
# echo "/usr/lib/nvidia-current/tls" | sudo tee -a /etc/ld.so.conf.d/GL.conf > /dev/null
This just add an ld path into /etc/ld.so.conf.d/GL.conf, otherwise, glx module cannot be loaded correctly. Here’s the /etc/log/Xorg.0.log segments:
1
2
3
4
5
6
(II) LoadModule: "glx"
(II) Loading /usr/lib/xorg/extra-modules/libglx.so
dlopen: libnvidia-tls.so.295.20: cannot open shared object file: No such file or directory
(EE) Failed to load /usr/lib/xorg/extra-modules/libglx.so
(II) UnloadModule: "glx"
(EE) Failed to load module "glx" (loader failed, 7)
Now, update ld runtime bindings and reboot.
1
2
# sudo ldconfig
# sudo reboot
4. Verify
1
2
# sudo apt-get install mesa-utils
# glxinfo | grep -i opengl
If your installation is successful, the output looks like:
1
2
3
4
5
OpenGL vendor string: NVIDIA Corporation
OpenGL renderer string: NVS 4200M/PCIe/SSE2
OpenGL version string: 4.2.0 NVIDIA 295.20
OpenGL shading language version string: 4.20 NVIDIA via Cg compiler
OpenGL extensions:
After installing the driver, hedgewars shows 120fps. While it used to show 4fps. It’s a great improvement. 🙂
# IFS (internal field separator) to separator string
IFSHOLD=$IFS
IFS=$'\n'
forentry in`cat/etc/passwd`;do
echo"Values in $entry:"
IFS=:
forvalue in$entry;do
echo" $value"
done
done
IFS=$IFSHOLD
2. while loop
Shell
1
2
3
4
5
6
7
#!/bin/bash
var1=10
while[$var1-gt0];do
echo$var1
var1=$[$var1-1]
done
3. until loop
Shell
1
2
3
4
5
6
7
#!/bin/bash
var1=100
until[$var1-eq0];do
echo$var1
var1=$[$var1-25]
done
4. break & continue
Shell
1
2
3
4
5
6
7
8
9
10
11
12
13
14
15
16
17
18
19
20
21
22
23
24
25
26
27
28
29
30
31
32
33
34
35
#!/bin/bash
# break
for((a=1;a<4;a++));do
echo"Outer loop: $a"
for((b=1;b<100;b++));do
if[$b-eq5];then
break
fi
echo"Inner loop: $b"
done
done
# break outer loop
for((a=1;a<4;a++));do
echo"Outer loop: $a"
for((b=1;b<100;b++));do
if[$b-eq5];then
break2
fi
echo"Inner loop: $b"
done
done
# continue outer loop
for((a=1;a<=5;a++));do
echo"Iteration $a:"
for((b=1;b<3;b++));do
if[$a-gt2]&&[$a-lt4];then
continue2
fi
var3=$[$a*$b]
echo" The result of $a * $b is $var3"
done
done
There may be times when you’re in an inner loop but need to stop the outer loop. The break command includes a single command line parameter value: break n where n indicates the level of the loop to break out of. By default, n is 1, indicating to break out of the current loop. If you set n to a value of 2, the break command will stop the next level of the outer loop.
5. redirect & pipe
Finally, you can either pipe or redirect the output of a loop within your shell script.
When creating a shell script file, you must specify the shell you are using in the first line of the file. The format for this is:
Shell
1
2
3
4
#!/bin/bash
# This script displays the date and who's logged on
date
who
In a normal shell script line, the pound sign(#) is used as a comment line. A comment line in a shell script isn’t processed by the shell. However, the first line of a shell script file is a special case, and the pound sign followed by the exclamation point tells the hell what shell to run the script under (yes, you can be using a bash shell and run your script using another shell).
2. Display
The echo command can display a simple text string if you add the string following the command.
Shell
1
2
3
4
5
6
7
8
9
10
11
12
13
14
15
16
17
18
19
#!/bin/bash
# basic usage
echoThisisatest.
echo"Let's see if this'll work"
# environment variables
echo"User info for user: $USER"
echoUID:$UID
echoHOME:$HOME
echo"The cost of the item is \$15"
# user variables
days=10
guest="Katie"
echo"$guest checked in $days days ago"
days=5
guest="Jessica"
echo"$guest checked in $days days ago"
# backtip
testing=`date`
echo"The date and time are: "$testing
The echo command uses either double or single quotes to delineate text strings. If you use them within your string, you need to use one type of quote within the text and the other type to delineate the string.
Notice that the environment variables in the echo commands are replaced by their current values when the script is run. Also notice that we were able to place the $USER system variable within the double quotation marks in the first string, and the shell script was still able to figure out what we meant.
You may also see variables referenced using the format ${variable}. The extra braces around the variable name are often used to help identify the variable name from the dollar sign.
User variables can be any text string of up to 20 letters, digits, or an underscore character. User variables are case sensitive, so the variable Var1 is different from the variable var1. This little rule often gets novice script programmers in trouble.
Values are assigned to user variables using an equal sign. No spaces can appear between the variable, the equal sign, and the value (another trouble spot for novices). Here are a few examples of assigning values to user variables.
The shell script automatically determines the data type used for the variable value. Variables defined within the shell script maintain their values throughout the life of the shell script but are deleted when the shell script completes.
Just like system variables, user variables can be referenced using the dollar sign. It’s important to remember that when referencing a variable value you use the dollar sign, but when referencing the variable to assign a value to it, you do not use the dollar sign.
The backtick allows you to assign the output of a shell command to a variable.
The inline input redirection symbol is the double less-than symbol (<<). Besides this symbol, you must specify a text marker that delineates the beginning and end of the data used for input. You can use any string value for the text marker, but it must be the same at the beginning of the data and the end of the data.
4. Math Expression
Shell
1
2
3
4
5
6
7
8
9
10
11
12
13
#!/bin/bash
var1=10
var2=3
var3=`expr$var1\*$var2`
var4=$[$var1*$var2]
var5=`expr$var1/$var2`
var6=$[$var1/$var2]
var7=`echo"scale=3; $var1 / $var2"|bc`
echoThe result is$var3
echoThe result is$var4
echoThe result is$var5
echoThe result is$var6
echoThe result is$var7
The expr command allowed the processing of equations from the command line. Note the spaces around operator is necessary. Escape character(backslash) is used to identify any characters that may be misinterpreted by the shell before being passed to the expr command.
Bash also provides a much easier way of performing mathematical equations. In bash, when assigning a mathematical value to a variable, you can enclose the mathematical equation using a dollar sign and square brackets ($[ operation ]).
The bash shell mathematical operators support only integer arithmetic. The most popular solution uses the built-in bash calculator, called bc.
5. Structured Commands
5.1 if/else
The bash shell if statement runs the command defined on the if line. If the exit status of the command is zero (the command completed successfully), the commands listed under the then section are executed. If the exit status of the command is anything else, the then commands aren’t executed, and the bash shell moves on to the next command in the script.
Shell
1
2
3
4
5
6
7
8
9
10
11
12
13
14
15
16
17
18
19
20
21
22
23
24
25
26
#!/bin/bash
user=gonwan
user2=test2
user3=test3
# if-then
ifgrep$user/etc/passwd;then
echo"The bash files for user $user are:"
ls-a/home/$user/.b*
fi
# if-then-else
ifgrep$user2/etc/passwd;then
echo"The bash files for user $user2 are:"
ls-a/home/$user2/.b*
else
echo"The user name $user2 does not exist on this system"
fi
#if-then-elif-then-else
ifgrep$user3/etc/passwd;then
echo"The bash files for user $user3 are:"
ls-a/home/$user3/.b*
elifgrep$user2/etc/passwd;then
echo"The bash files for user $user2 are:"
ls-a/home/$user2/.b*
else
echo"The user name $user2 and $user3 does not exist on this system"
fi
5.2 test
The test command provides a way to test different conditions in an if-then statement. If the condition listed in the test command evaluates to true, the test command exits with a zero exit status code, making the if-then statement behave in much the same way that if-then statements work in other programming languages. If the condition is false, the test command exits with a 1, which causes the if-then statement to fail.
*) Numeric Comparisons
Comparison
Description
n1 -eq n2
Check if n1 is equal to n2.
n1 -ge n2
Check if n1 is greater than or equal to n2.
n1 -gt n2
Check if n1 is greater than n2.
n1 -le n2
Check if n1 is less than or equal to n2.
n1 -lt n2
Check if n1 is less than n2.
n1 -ne n2
Check if n1 is not equal to n2.
Shell
1
2
3
4
5
6
7
8
9
10
11
12
13
#!/bin/bash
val1=10
val2=11
if[$val1-gt$val2];then
echo"$val1 is greater than $val2"
else
echo"$val1 is less than $val2"
fi
if(($val1>$val2));then
echo"$val1 is greater than $val2"
else
echo"$val1 is less than $val2"
fi
However, The test command wasn’t able to handle the floating-point value.
You may also notice usage of double parentheses. It provide advanced mathematical formulas for comparisons, no escape is needed in it:
Symbol
Description
val++
Post-increment
val–
Post-decrement
++val
Pre-increment
–val
Pre-decrement
!
Logical negation
∼
Bitwise negation
**
Exponentiation
<<
Left bitwise shift
>>
Right bitwise shift
&
Bitwise Boolean AND
|
Bitwise Boolean OR
**
Exponentiation
&&
&& Logical AND
||
Logical OR
*) String Comparisons
Comparison
Description
str1 = str2
Check if str1 is the same as string str2.
str1 != str2
Check if str1 is not the same as str2.
str1 < str2
Check if str1 is less than str2.
str1 > str2
Check if str1 is greater than str2.
-n str1
Check if str1 has a length greater than zero.
-z str1
Check if str1 has a length of zero.
Trying to determine if one string is less than or greater than another is where things start getting tricky. There are two problems that often plague shell programmers when trying to use the greater-than or less-than features of the test command:
– The greater-than and less-than symbols must be escaped, or the shell will use them as redirection symbols, with the string values as filenames.
– The greater-than and less-than order is not the same as that used with the sort command.
Shell
1
2
3
4
5
6
7
8
9
10
11
12
13
#!/bin/bash
val1=ben
val2=mike
if[$val1\>$val2];then
echo"$val1 is greater than $val2"
else
echo"$val1 is less than $val2"
fi
if[[$val1>$val2]];then
echo"$val1 is greater than $val2"
else
echo"$val1 is less than $val2"
fi
The double bracketed expression uses the standard string comparison used in the test command. However, it provides an additional feature that the test command doesn’t, pattern matching. No escape is needed anymore.
Capitalized letters are treated as less than lowercase letters in the test command. However, when you put the same strings in a file and use the sort command, the lowercase letters appear first. This is due to the ordering technique each command uses. The test command uses standard ASCII ordering, using each character’s ASCII numeric value to determine the sort order. The sort command uses the sorting order defined for the system locale language settings. For the English language, the locale settings specify that lowercase letters appear before uppercase letters in sorted order.
While the BashFAQ said: As of bash 4.1, string comparisons using < or > respect the current locale when done in [[, but not in [ or test. In fact, [ and test have never used locale collating order even though past man pages said they did. Bash versions prior to 4.1 do not use locale collating order for [[ either. So you get opposite result when running on CentOS-5.7(bash-3.2) and Ubuntu-10.04(bash-4.1) with [[ operator. And bash-4.1 is consistent with sort command now.
5.3 case
Well, this is easy, just walk through the snippet:
Shell
1
2
3
4
5
6
7
8
9
10
11
12
13
14
15
16
#!/bin/bash
case$USERin
gonwan|barbara)
echo"Welcome, $USER"
echo"Please enjoy your visit"
;;
testing)
echo"Special testing account"
;;
jessica)
echo"Do not forget to log off when you're done"
;;
*)
echo"Sorry, you are not allowed here"
;;
esac
All sample code are tested under CentOS-5.7 and Ubuntu-10.04.
There are three ways of starting a bash shell:
– As a default login shell at login time
– As an interactive shell that is not the login shell
– As a non-interactive shell to run a script
Login Shell
When you log in to the Linux system, the bash shell starts as a login shell. The login shell looks for four different startup files to process commands from. The following is the order in which the bash shell processes the files:
If you start a bash shell without logging into a system (such as if you just type bash at a CLI prompt), you start what’s called an interactive shell. The interactive shell doesn’t act like the login shell, but it still provides a CLI prompt for you to enter commands.
If bash is started as an interactive shell, it doesn’t process the /etc/profile file. Instead, it checks for the .bashrc file in the user’s HOME directory.
Non-interactive Shell
Finally, the last type of shell is a non-interactive shell. This is the shell that the system starts to execute a shell script. This is different in that there isn’t a CLI prompt to worry about. However, there may still be specific startup commands you want to run each time you start a script on your system.
To accommodate that situation, the bash shell provides the BASH_ENV environment variable. When the shell starts a non-interactive shell process, it checks this environment variable for the name of a startup file to execute. If one is present, the shell executes the commands in the file.
2. Terminfo Database
The terminfo database is a set of files that identify the characteristics of various terminals that can be used on the Linux system. The Linux system stores the terminfo data for each terminal type as a separate file in the terminfo database directory. The location of this directory often varies from distribution to distribution. Some common locations are /usr/share/terminfo, /etc/terminfo, and /lib/terminfo.
Since the terminfo database files are binary, you cannot see the codes within these files. However, you can use the infocmp command to convert the binary entries into text.
The Linux shell uses the TERM environment variable to define which terminal emulation setting in the terminfo database to use for a specific session. When the TERM environment variable is set to vt100, the shell knows to use the control codes associated with the vt100 terminfo database entry for sending control codes to the terminal emulator.
3. Virtual Consoles
With modern Linux systems, when the Linux system starts it automatically creates several virtual consoles. A virtual console is a terminal session that runs in memory on the Linux system. Instead of having several dumb terminals connected to the PC, most Linux distributions start seven (or sometimes even more) virtual consoles that you can access from the single PC keyboard and monitor.
In most Linux distributions, you can access the virtual consoles using a simple keystroke combination. Usually you must hold down the Ctl+Alt key combination, and then press a function key (F1 through F8) for the virtual console you want to use. Function key F1 produces virtual console 1, key F2 produces virtual console 2, and so on.
4. Environment Variables
There are two types of environment variables in the bash shell:
– Global variables
– Local variables
Global environment variables are visible from the shell session, and from any child processes that the shell spawns. Local variables are only available in shell that creates them. This makes global environment variables useful in applications that spawn child processes that require information from the parent process.
Get
To view the global environment variables, use the printenv command.
To display the value of an individual environment variable, use the echo command. When referencing an environment variable, you must place a dollar sign($) before the environment variable name.
Unfortunately there isn’t a command that displays only local environment variables. The set command displays all of the environment variables set for a specific process. However, this also includes the global environment variables.
Set
You can assign either a numeric or a string value to an environment variable by assigning the variable to a value using the equal sign(=). It’s extremely important that there are no spaces between the environment variable name, the equal sign, and the value. If you put any spaces in the assignment, the bash shell interprets the value as a separate command.
The method used to create a global environment variable is to create a local environment variable and then export it to the global environment.
Of course, if you can create a new environment variable, it makes sense that you can also remove an existing environment variable. You can do this with the unset command.When referencing the environment variable in the unset command, remember not to use the dollar sign.
NOTE: When dealing with global environment variables, things get a little tricky. If you’re in a child process and unset a global environment variable, it applies only to the child process. The global environment variable is still available in the parent process.
Since the DVD size of CentOS 5.x is largely increased(1.7G for 3.x, 2.3G for 4.x, while 4.0G for 5.x), I decided to use the CD approach. I downloaded the first CD image from one of its mirror site: http://mirrors.163.com/centos/5.6/isos/i386/.
– You can do a minimal install that just requires the first CD by performing the following two steps during the installation:
** During the category/task selection, deselect all package categories, and choose the “Customize now” option at the bottom of screen.
** During the customized package selection, deselect everything ( including the Base group ).
– There are reports that more than CD 1 is required in the following case:
** If you use some software raid options (this will also require CD 2 and 5)
** If you use encrypted filesystems
– When the anaconda installer notes that additional disks will be required but you desire a one CD install, the quick answer is one or more of the following approaches:
** Trim back and do a minimal install. Then once the install is up and running, pull in more packages with yum and add more options later.
– If you want to avoid using more than one CD but want to install more than just the minimal set of packages, you could also consider doing a network installation. A network installation ISO (called boot.iso) is available from the 5/os/<arch>/images/ directory on CentOS mirrors.
– This latter mode of installation, however, is only really reliable via a LAN (an Intranet installation) and not via the Internet.
From my practice, you MUST follow the de-selection order. Otherwise, it will still require other CDs. The actual installation lasts for about 1 minutes(installation of *.rpm files). After reboot, the system gives you a minimum installation with only text mode support. Now login with your root account, and make sure your network is ready. Additional components shall be installed manually using yum:
Actually, if only “X Window System” are passed to yum, you will get a simple GUI with an xterm and an xclock after running “startx” command.
You may want to take coffee during the process. For me, about 350M contents were downloaded. Reboot when finished and add “single” option to enter single mode in GRUB menu.
Since the first CD does not install GUI contents, so the runlevel is set to 3(text mode) by default after installation. We should switch it to 5(GUI mode) by editing /etc/inittab file, Find the line and change the middle value from 3 to 5:
1
id:3:initdefault:
Now, we want to start the “firstboot” configuration utility to simplify our user account creation and other initial configurations. Check /etc/sysconfig/firstboot file, and make sure the value is set to “YES” like:
1
RUN_FIRSTBOOT=YES
If the value is “NO”, the “firstboot” utility is skipped and GDM is displayed directly. When all have been done, issue the “exit” command to return to the normal startup process. This time, the “firstboot” wizard should show.
Here is the GDM screenshot after all above steps:
PS:
In 6.x, CentOS provides LiveCD and LiveDVD that can be used also for installation. But in 5.x, they can only be used for trial experience.
In 4.x/3.x, the openoffice suite is outdated, I suggest to not install them. I also suggest to remove redundant kernels:
There’s 4.9 release but no 4.9 *.iso images. The readme.txt says:
– The upstream provider did not respin media for the 4.9 release and therefore the CentOS project will also not respin our install media.
– Installs moving forward will be off the 4.8 media and an upgrade will move you from version 4.8 to version 4.9.
– We do this to maintain compatibility with 3rd party kernel drivers which are designed to be installed as part of the installation process.
Run “yum update” to update from 4.8 to 4.9. For me, about 300M contents were downloaded.
In 3.x release, I suggest to select “Kernel Development” group during installation. The 2.4.x kernel needs its source to compile kernel modules(like virtual machine addons).
By default, You need to guide Vim to decode double-byte encodings like GBK and Big5. The default Vim configuration only works well with Unicode encodings including utf-8, utf-16, utf-16be etc..Edit your .vimrc file, add line like:
1
set fileencodings=ucs-bom,utf-8,gbk,big5,latin1
Now Vim is able to detect and decode GBK and Big5 encodings automatically. And according my experience, Vim respects utf-16 and utf-16be files only they have BOM byes. Otherwise, these files are wrongly decoded. In this case, you may want to manually reopen the file using a correct encoding. The Vim command like:
1
:e ++enc=<your_encoding>
And Vim does not store BOM when saving by default. To enable/disable BOM saving, use:
1
2
:set bomb
:set nobomb
I’ve attached a series of text files to learn the usage. These text file all contains string “123你好”, but saved in different encodings. Let’s list their code points first:
The objective of this article is to make Vim your programmer’s editor.
First, a normal version of Vim should be installed to enable syntax highlighting. The default installation of Ubuntu 10.04 only contains a compact version “vim-tiny”:
1
# sudo apt-get install vim
Then copy a local vim configure file:
1
2
# cp /etc/vim/vimrc ~/.vimrc
# vi ~/.vimrc
1. Line Number
Add line into the .vimrc file:
1
set number
A similar command can be used to show/hide line number when editing on the fly:
1
2
:set number
:set nonumber
Related help:
1
2
:help set
:help 'number'
2. Tab-space Conversion
From the Vim help:
'tabstop' 'ts'          number  (default 8)
                        local to buffer
        Number of spaces that a  in the file counts for.  Also see
        |:retab| command, and 'softtabstop' option.

        Note: Setting 'tabstop' to any other value than 8 can make your file
        appear wrong in many places (e.g., when printing it).

        There are four main ways to use tabs in Vim:
        1. Always keep 'tabstop' at 8, set 'softtabstop' and 'shiftwidth' to 4
           (or 3 or whatever you prefer) and use 'noexpandtab'.  Then Vim
           will use a mix of tabs and spaces, but typing  and  will
           behave like a tab appears every 4 (or 3) characters.
        2. Set 'tabstop' and 'shiftwidth' to whatever you prefer and use
           'expandtab'.  This way you will always insert spaces.  The
           formatting will never be messed up when 'tabstop' is changed.
        3. Set 'tabstop' and 'shiftwidth' to whatever you prefer and use a
           |modeline| to set these values when editing the file again.  Only
           works when using Vim to edit the file.
        4. Always set 'tabstop' and 'shiftwidth' to the same value, and
           'noexpandtab'.  This should then work (for initial indents only)
           for any tabstop setting that people use.  It might be nice to have
           tabs after the first non-blank inserted as spaces if you do this
           though.  Otherwise aligned comments will be wrong when 'tabstop' is
           changed.
I will choose to use the 2nd approach, so add:
1
2
3
set expandtab
set tabstop=4
set shiftwidth=4
The auto-indent feature is also useful:
1
set autoindent
When setting expandtab, a real tab can be input by <Ctrl-v>_<Tab>
Related help:
1
2
3
4
5
:help autoindent
:help expandtab
:help tabstop
:help shiftwidth
:help retab
3. Option ‘modeline’:
If you start editing a new file, and the ‘modeline’ option is on, a number of lines at the beginning and end of the file are checked for modelines. This is simply enabled by adding:
1
set modeline
Your C/C++ comment may look like one of the following:
C++
1
2
/* vi: set ai ts=4 sw=4: */
/* vim: set ai et ts=4 sw=4: */
And likely, the Python comments:
Python
1
2
# vi: set ai ts=4 sw=4:
# vim: set ai et ts=4 sw=4:
Here, ai, et, ts and sw are just abbreviations. And expandtab is an option only in Vim, not Vi.
Read related help by typing:
1
:help modeline
4. Using Taglist:
There are lots of useful scripts in the Vim website that we can use. But Actually, Ubuntu repository also has some of them included:
After installation, these scripts are just downloaded, but not installed for your Vim. We list available script by typing:
1
# vim-addons
Output on Lucid 10.04:
1
2
3
4
5
6
7
8
9
10
11
12
13
14
15
16
17
18
19
20
21
22
23
24
25
26
27
28
29
30
31
32
33
34
35
36
# Name User Status System Status
align removed removed
alternate removed removed
bufexplorer removed removed
calendar removed removed
closetag removed removed
colors sampler pack removed removed
detectindent removed removed
doxygen-toolkit removed removed
editexisting removed removed
enhanced-commentify removed removed
gnupg removed removed
info removed removed
justify removed removed
lbdbq removed removed
markdown-syntax removed removed
matchit removed removed
minibufexplorer removed removed
nerd-commenter removed removed
omnicppcomplete removed removed
po removed removed
project removed removed
python-indent removed removed
secure-modelines removed removed
snippetsEmu removed removed
sokoban removed removed
supertab removed removed
surround removed removed
taglist removed removed
tetris removed removed
utl removed removed
vcscommand removed removed
vimplate removed removed
whatdomain removed removed
winmanager removed removed
xmledit removed removed
The Taglist plugin is described here, while OmniCppComplete plugin in next section. Both of them make use of ctags utility. Install it first:
1
# sudo apt-get install exuberant-ctags
Now install the Taglist plugin to your Vim:
1
# vim-addons install taglist
When editing a supported file type, Show the taglist window can be opened by one of the following:
1
2
3
:Tlist
:TlistOpen
:TlistToggle
Move your cursor between windows by <Ctrl-w>_w as usual. You may want to add a shortcut to toggle this feature. Add lines to your .vimrc file per official document:
1
2
nnoremap <silent> <F5> :TlistUpdate<CR>
nnoremap <silent> <F6> :TlistToggle<CR>
When your cursor hovers on a function, <Ctrl-]> takes you to its declaration, while <Ctrl-t> takes you back.
More help:
1
2
:help taglist-using
:help taglist-options
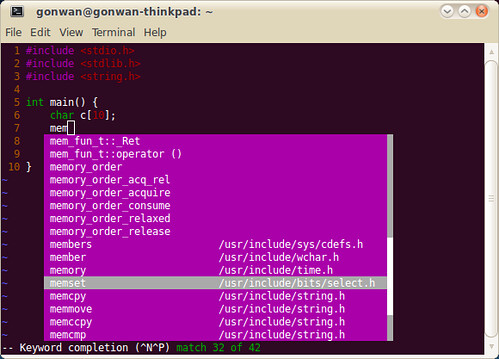
5. Using OmniCppComplete:
Vim include basic support for code completion. The simplest way is to use <Ctrl-p>. Vim will search your include headers and do insertion. See the screenshot:
The include search path can be set by:
1
:set path <your_path>
More help info:
1
2
:help 'complete'
:help ins-completion
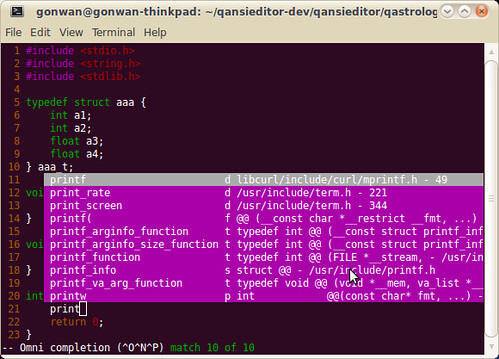
Next, Vim provides basic C language completion using ctags. No C++ is supported. Additional languages script can be found in Vim’s autoload directory, say /usr/share/vim/vim72/autoload. But you should generate necessary ctags index files first. For libc6 header files:
let OmniCpp_ShowPrototypeInAbbr = 1 " function parameters
let OmniCpp_MayCompleteScope = 1 " autocomplete after ::
let OmniCpp_DefaultNamespaces = ["std", "_GLIBCXX_STD"] " see :help omnicpp-faq
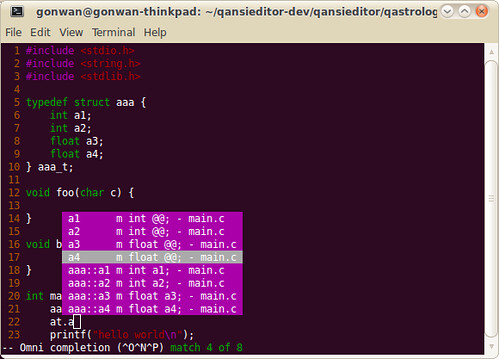
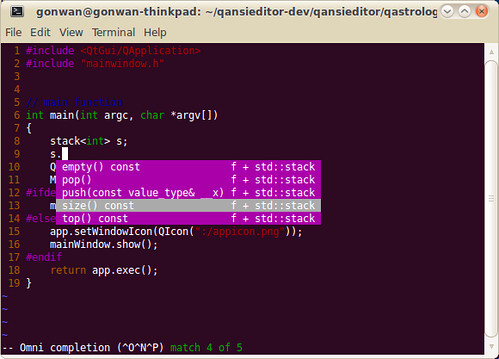
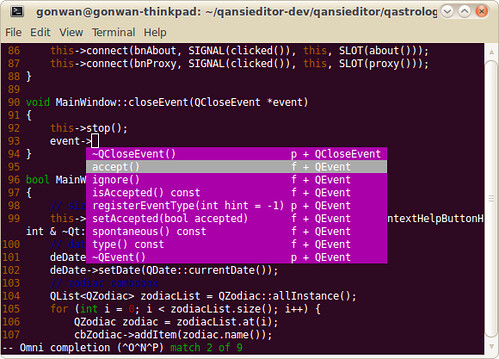
You may encounter problems when completing STL functions. Refer to :help omnicpp-faq and find the solution. Anyway, it works all good for me. Here’re screenshots showing STL and Qt code completion:
!!!NOTE!!! : The tags file for current file must be generated for OmniCppComplete to work. I’ve set Ctrl+F12 as the accelerate key. Otherwise, you’ll get “Pattern not found” error. More help:
1
2
:help omnicpp-options
:help omnicpp-features
Finally, the list of lines adding to my .vimrc file: