WordPress Hardening with Cloudflare

Now the site is under protection of Cloudflare. Some settings:

1. Cloudflare as CDN

Cloudflare DNS to configured to proxy the original server. The DNS is also served as CDN. It also adds IPv6, HTTP2 & HTTP3 support. Cloudflare IPs are whitelisted in the inbound rules of my upstream VPS. mod_remoteip is enabled in Apache2, and configure with RemoteIPHeader X-Forwarded-For for logging.

Go to SSL/TLS / Overview, set SSL/TLS encryption mode to Full (strict).

1.1 Redirect Rule: Redirect from root to www

Go to Rules/Overview to add a cache rule.

NOTE: wordpress does redirect root URL to www URL internally, to align with the Site Address settings in Settings/General. It can be observed by:

I just delegated this job to Cloudflare.

2. Security Settings

2.1 Security Headers

In Rules/Settings, check Add security headers. It adds 3 headers in response: X-Content-Type-Options: nosniff, X-Frame-Options: SAMEORIGIN and X-XSS-Protection: 1; mode=block.

2.2 WAF Rule: Challenge empty referer

Only pseudo code is used to describe the rules, to keep it a secret from web crawlers. Go to Security/WAF.

I actually merge several rules into one, since only 5 rules can be added for a free Cloudflare plan. Here, we allow Let's Encrypt to bypass the rule. Their servers renew certificates through plain Http requests.

2.3 WAF Rule: Block xmlrpc.php

Here, we fixed several wordpress security holes by blocking them. xmlrpc.php is only cared by malicious crawlers. wp-login.php is blocked, since I have moved the login entrance to somewhere else. wp-config* is certainly blocked. It may become wp-config.php.txt or wp-config.php.bak one day when you backup the config, and your password is exposed. /wp-admin* is certainly blocked. No wordpress plugin should access it, it is a design defect.

2.4 WAF Rule: Block bots

Here, we block 3 crawlers. Actually only Baidu spider is required, it ignores robots.txt.

2.5 WAF Rule: Block flood

This is a rate limiting rule. Only 1 rule can be used for a free Cloudflare plan. We limit malicious access to php and uncommon resource file types. Cloudflare does have DDOS protection in the free plan. I just add one more.

3. Cache Settings

3.1 Configure Default Browser Cache TTL

In Caching/Configuration, set Browser Cache TTL to Respect Existing Headers.

3.2 Cache Rule: Cache resources

Go to Rules/Overview to add a cache rule.

Edge TTL specifies how long Cloudflare should cache the response, distinguish from Browser TTL. Default TTL for 404 is 3m, while for 200 is 120m. See here. Resource files in wordpress are request by a version parameter to invalidate themself. 120m is a too short duration for them.
Cache control can also be configured in the original server. But I choose to adopt Cloudflare.

3.3 Cache Rule: Cache major pages

Yes, we cache error pages, to offload the workload of original server. Major pages are defined as root page(/) and individual wordpress post pages. Cloudflare gives 512M cache space for a free plan, see here.
Couldflare does not cache HTML by default, explicit configuration is required, see here (It does cache robots.txt). Cloudflare returns cf-cache-status: DYNAMIC response header by default. With our configuration, it returns cf-cache-status: EXPIRED. A bit strange, but this is my desired behavior. Explanation here:

HIT: The resource was served from the Cloudflare cache
MISS: There was a cache miss and the resource was served from the origin server
DYNAMIC: The resource was not eligible to be cached based on your Cloudflare cache rules
BYPASS: The resource would normally be cached, by was the behavior was overridden by a cache-control header or because the origin server set a cookie
EXPIRED: Cloudflare found a stale resource in the cache and had to fetch it again

Custom filter expression is selected for incoming requests matching. Since All incoming requests also matches php file, which is used by wordpress admin console. It will be a mess if all admin functions are cached.

3.4 Cache Rule: Cache minor pages

Error pages are also cached here. Minor pages are like /tags/... and /category/.... They are updated in 7 days.

4. Conclusion

With all configurations above, the cache hit rate is about 70% – 90% in average. All configurations are monitored and adjusted this week. WordPress is a legacy monolithic application. It is all-purpose and it can do almost anything regarding content management with plugins. It mixes frontend and backend. It mixes content service and content administration. All those mess make it tricky to setup and tweak correctly.

Some alternatives are found:
Ghost: The most ideal one, with some drawbacks. a. It does not use html or markdown for contents. b. Plugin installation may require manual file operations. File overwrites are possible. c. Is a raw customized html page possible?
Kirby: It is lightweight, but I do not want php any more.
Strapi and other headless CMS: not so user friendly or costs time to adapt.

Maybe a simple SSG-based blog is the final destination. No more php, no more CDN, no more endless plugins, no more tricky config and hardening work.
Some WordPress Hardening Work

1. Disable File Access

2. Disable wp-cron.php

See here.

The default method works perfectly fine on a small site with very few visitors per hour. However, when implemented on a medium or larger site or even a site that is being scanned by bots (which is very common these days), this means you get twice fold whatever traffic you are currently handling. It becomes a rudimentary DDoS attack against yourself.

Add define('DISABLE_WP_CRON', true); to wp-config.php.

3. Disable Pingback in Comments

Go to Settings –> Discussion, uncheck Allow link notifications from other blogs (pingbacks and trackbacks) on new posts.

4. Disable Json API

Via Disable WP REST API. Activate and it just works.

5. Hide Login Page

Via WPS Hide Login.

6. Hide Server Info

Via mod_security. Install and add config in /etc/apache2/mods-enabled/security2.conf:

7. Disallow IFrame Embedding

To avoid clickjacking attacks:

8. Add reCAPTCHA

Via Advanced Google reCAPTCHA.

9. Refine robots.txt

Via WP Robots Txt:

The /wp-admin/admin-ajax.php path is allowed by default, see here and here. Simply remove it.
Updated May 8, 2025: It seems Baiduspider ignores robots.txt, since no access log for the file is found in latest 5 years. Simply blocked it in Cloudflare WAF.

10. More Fail2ban Rules

Including 400/403/404 errors, directory listing filters, and subnet bannning.

Keyboard Backlight Control on Lenovo Ideapad & Xiaoxin Models

Ever found the keyboard backlight annoying? It keeps turning on when booting Windows, and there is no configuration to disable it permanently in any Lenovo Utilities.

Just did some reverse engineering to find how to control keyboard backlight programmatically. The principal is simple, use \\.\EnergyDrv device exposed by Lenovo ACPI energy management driver. It is capable of controlling all keyboard backlight levels. Also other capabilities available 🙂 . See code:

Should built and run on any C99 compilers. Run with <app.exe> [0|1|2|3]. You can add it to task scheduler to disable keyboard backlight on startup.

Also checked other approaches. The usb/hid way does not work on an ideapad. The Keyboard_Core.dll hack also does not work, I cannot find the file in drivers.

11 Years of My Site

As the recorded by Linode, the site server was first launched on Apr 1, 2014. It was running Ubuntu 12.04. Later I setup wordpress and moved my blog here from Blogspot on Aug 16, 2024. Spurious Wakeups was my first post. Now, the server is running Ubuntu 24.04, and is using catch box theme with css customization:

Just updated all plugins and found 3 problems.

1. Google Analytics 4

Google fully replaced Universal Analytics with Google Analytics 4 on July 1, 2024. Just noticed that, all visiting history are lost 🙁

2. Fail2ban not working

Fail2ban is not working anymore, due to the switch from iptables to nftables in Ubuntu 21.10. So it has broken for about 2 years, since my last upgrade to Ubuntu 22.04. Found the issue by running fail2ban-client -d. Simply revert the change in config sudo vi /etc/fail2ban/jail.d/defaults-debian.conf.

Since Fail2ban also updated its default backend from pyinotify to systemd(see above), backend should be also reverted in wordpress config sudo vi /etc/fail2ban/jail.d/wordpress.conf.

Make sure package python3-pyinotify and python3-systemd are installed. Restart Fail2ban.

3. Akismet not working

Akismet is reporting 500 errors. Details are found in logs: .../plugins/akismet/.htaccess: Require not allowed here. This is sloved by adding config to apache server to allow AuthConfig, in both http and https config files.

Redis Alternatives and Relates

1. Tendis

From Tencent, based on RocksDB as persistent storage. Binlog to support resuming transport when running replication.

2. Kvrocks

Apache project, poor document. Have seen no advantage over Tendis so far. Also based on RocksDB.

3. KeyDB

Redis fork, multi-threading adopted.

4. Codis

A Redis proxy, clients are not required to know the cluster protocol.

5. redis-cluster-proxy

A Redis proxy, clients are not required to know the cluster protocol.

6. RedisShake

Redis data synchronization(Cross DC). Launch multiple process if sync source is a cluster setup. Used for one-shot full sync scenario, not recommanded for long-time incremental sync.

Benchmark for Web Frameworks

https://github.com/gonwan/toys/blob/master/webframework-benchmark/readme.md

See Techempower. This repository contains homemade java benchmarks using spring-mvc, spring-webflux and netty-http/netty-tcp servers based on reactor-netty. gin and gnet are also included. wrk is used as client. gobench is also considered but it is not so good as wrk.

Environment 1

  • Server: 8C16G vm
  • Client: 4C8G vm * 2
Server Server Throughput Server CPU
spring-mvc 25k ~ 30k /s ~600%
spring-webflux 90k ~ 110k /s ~780%
go-gin 110k ~ 120k /s ~600%
go-gnet 110k ~ 120k /s ~270%
netty-http 110k ~ 120k /s ~480%
netty-tcp 110k ~ 120k /s ~360%

2 VM Clients are not able to fully utilize the server capability. The initial attempts were benchmarking only first 4 cases. And the go-gnet results made me wonder, it can give much more throughput. After reading the source of it, I found go-gnet case is actually a TCP server with very very little of HTTP implementation to fulfill the benchmark, which is unfair for other cases. Therefore, I added case 5/6 in java to align with it.

Environment 2

  • Server: 24C32G physical machine
  • Client:
    • 4C8G vm * 2
    • 8C16G vm * 1
    • 24C32G physical machine * 1
Server Server Throughput Server CPU
spring-mvc ~120k /s ~1560%
spring-webflux ~180k /s ~2380%
go-gin ~380k /s ~2350%
go-gnet 560k ~ 580k /s ~1160%
netty-http 560k ~ 580k /s ~2350%
netty-tcp 560k ~ 580k /s ~1460%

Still room to give more throughput in go-gnet and netty-tcp cases. Not having so many idle systems for benchmarking now. The throughput should have a linear increment when more CPU is utilized, in both cases.

As a developer, spring-mvc or go-gin can still be the first choice, as they are easier to get started.


Enabing Pretty Permalinks

Well.. long time no see. Just have some time to optimize the site for better analysis.

According to the official tutorial:
1. Enable mod_rewrite in apache2.

2. Enable FollowSymLinks option, which is default.
3. Enable FileInfo directives. Edit /etc/apache2/sites-available/yoursite.com.conf, add:

4. Restart apache:

Updated Dec 31, 2015:
Enabling mod_rewrite rewrites all requests including the one used by mod_status. To disable this, add a rule to the .htaccess file.

Then, change its user & group attributes to prevent overwriting from apache.

Setting up Serial Console on VirtualBox

I’m running Ubuntu 12.04 as host, with VirtualBox 4.2.22. This tutorial should cover guests including Windows XP, CentOS and Ubuntu.

1. Settings in VirtualBox

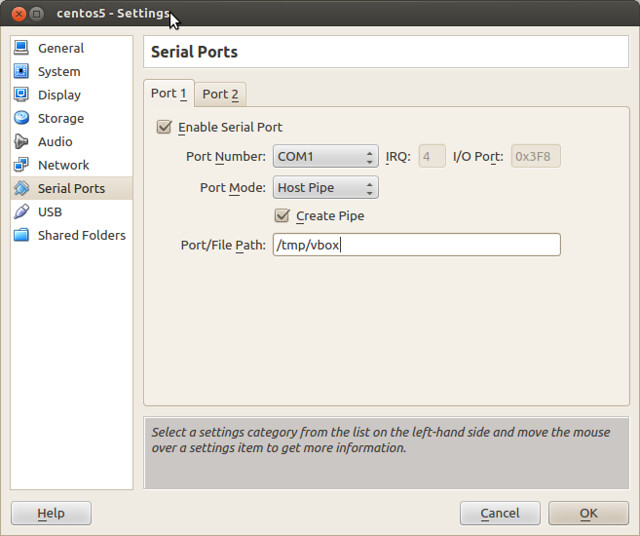
In the settings page, Check “Enable Serial Port”, set “Port Number” to “COM1”. This is the port number in the guest. If the guest is a Linux, COM1 is shown as /dev/ttyS0, and COM2 is shown as /dev/ttyS1.

Set “Port Mode” to “Host Pipe”, check “Create Pipe” and set “Port/File Path” to “/tmp/vbox”. Seems it utilizes a named pipe. These settings work even if the host does not have a physical serial device.

serial_console_1

2. Install minicom

The second command setups minicom with an interactive menu. Select “Serial port setup”, and set “Serial Device” as “unix#/tmp/vbox”(without quotes). “Save setup as dfl” and “Exit from Minicom”.

3. Verity the serial device in guest

Now boot your Linux guest. Run the following command, and it should output something like:

The guest here is CentOS5, and the serial device is /dev/ttyS0.

4. Communication via serial device

Start minicom on your host:

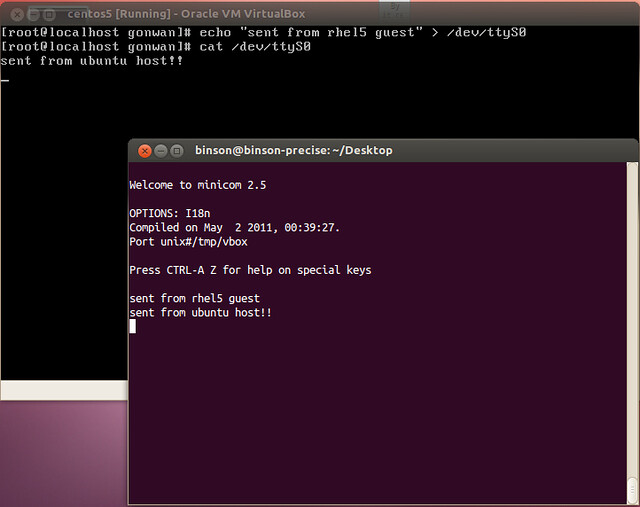
Echo something from your guest and redirect to /dev/ttyS0. You host should get the message in minicom.

To read from the host, cat the device in guest so that you can do the input in minicom:

serial_console_2

5. Kernel configuration

CentOS5 comes with grub1, /etc/grub.conf is modified directly to allow the boot information to also be sent to our serial device. The original boot entry looks like:

Change to add console= parameter:

That’s all for CentOS 5/6. There’s no need to modify /etc/inittab or /etc/securetty file as required in ArchLinux. These OS will do it for you.

Now, reboot your guest CentOS. The boot information should now displayed in your minicom. Finally, it will provide you with a login shell.

serial_console_3
You can verify that there’s a new line added into /etc/inittab to enable getty(8) and execute a login shell:

And ttyS0 is also added into /etc/securetty.

6. Ubuntu guest settings

Ubuntu 12.04 come with grub2. We do not modify /boot/grub/grub.cfg, we modify /etc/default/grub instead, so that the serial console parameters will remain even after you update your kernel. Open it, modify the following line to:

And update grub:

One additional step for Ubuntu, is to enable getty(8) for serial console by your own. Ubuntu uses upstart init system, we need to create a file called /etc/init/ttyS0.conf containing the following:

Reboot you Ubuntu guest, and the serial device should work as it is with CentOS. More info, please refer to the official wiki.

7. Windows guest settings

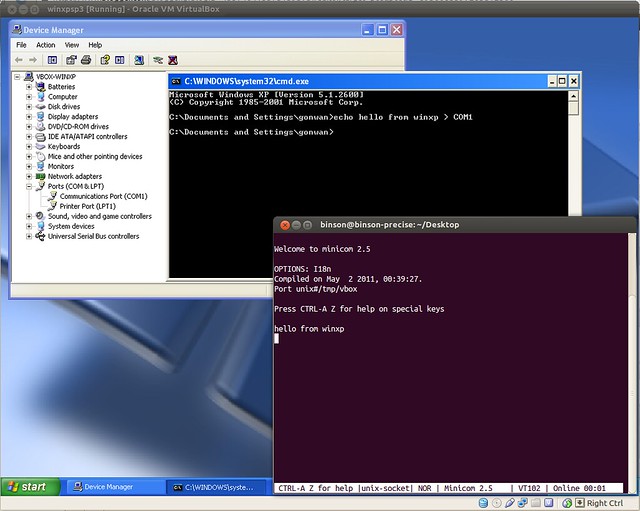
The serial device shows as COM1 in Windows XP as previously set. With a simple echo and redirect, our host can receive the message.

serial_console_4

8. Windows as host

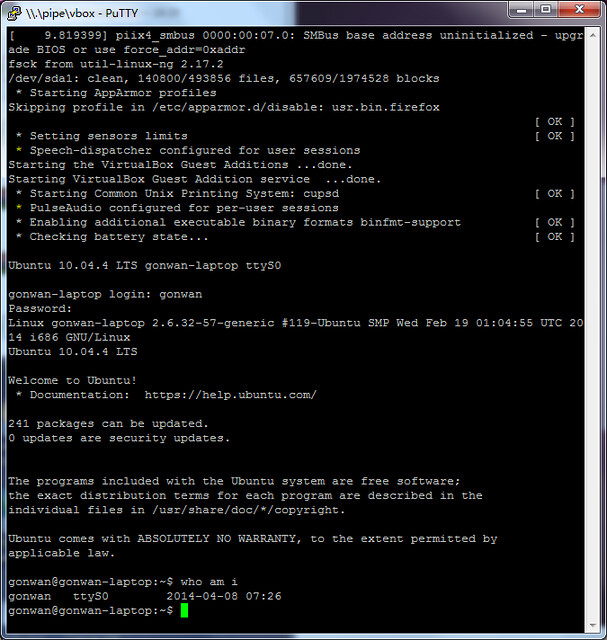
Settings of VirtualBox under Windows is almost the same as that under Linux. But we set “Port/File Path” to “\\.\pipe\vbox”, instead of “/tmp/vbox”. After the configuration of kernel and getty(8), we can use PuTTY to connect. Simply set “Connection type” to “Serial”, and “Serial line” to “\\.\pipe\vbox”.
serial_console_5