Symbian Development on Linux

This article borrows hugely from: http://labs.qt.nokia.com/2010/12/17/experimental-packages-for-symbian-development-on-linux/

First, there’s Qt SDK and Nokia Qt SDK. In a word, Qt SDK is for desktop development, while Nokia Qt SDK is for mobile development. A detailed comparison can be found here.

Then, there’s S60 SDK. Is it necessary to install it before developing symbian applications? The S60 SDK is only available under Windows platform. Under Windows, Nokia Qt SDK is an all-in-one package. It includes S60 SDK, Qt SDK, QtSimulator and a Symbian compiler. So, the AIO package is recommended. There’s another choice under Windows: S60 SDK + Qt for Symbian. The Symbian version can be found here. But this time, there’s no simulator.

As mentioned here, These two SDK will be merged in Nokia Qt SDK 1.1.

Now, we will have our Linux tutorial for Ubuntu.

1. Download and install the following packages (32-bit versions only):
* gcce-4.4.172-r1.deb
* s60-sdk-5.0.deb
* runonphone-4.7.1.deb
* qt-symbian-libs-4.7.1-r1.deb (Old version: qt-symbian-libs-4.7.1.deb)

2. Install App TRK on your phone. It’s a debug service. Find *.sisx files here. Check the TRKPackages.xml file to get correct version for your phone. For my C5-03, I used s60_5_0_app_trk_3_2_7.sisx.

3. Install Qt libs for Symbian. They can be found at Qt’s ftp site: ftp://ftp.qt.nokia.com/pub/qt/symbian/. I installed version 4.7.1 as the developing library. Here’s what exactly each *.sis package contains:

* fluidlauncher.sis
Contains around 10 different Qt demos. Depends on Qt and Open C.
* qt.sis
Contains the Qt libraries Symbian Signed for Nokia phones. Depends on Open C.
* qt_selfsigned.sis
A self-signed version of the above library. Works on other phones such as the Samsung i8910.
* qtwebkit.sis
Contains the QtWebKit library Symbian Signed for Nokia phones. Depends on Qt.
* qtwebkit_selfsigned.sis
A self-signed version of the above library. Works on other phones such as the Samsung i8910.
* qt_demos.sis
Contains qt.sis, qtwebkit.sis, fluidlauncher.sis and Open C all in one convenient package. No other dependencies.
* qt_installer.sis
Contains qt.sis, qtwebkit.sis and Open C all in one convenient package. No other dependencies.

Installing qt_installer.sis is enough.

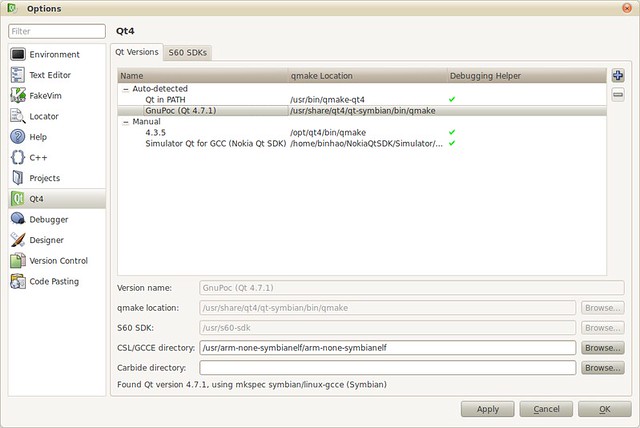
4. Configure your QtCreator, add QtSimulator and QtSymbian versions. The Qt4 page should be something like:

qt_symbian_1

5. Now, create a simple GUI application and add desktop/simulator/device targets, so that you can run on all of them.
qt_symbian_2

6. Run on phone.

When App TRK is installed, connect the phone to the PC using the USB cable. Select “PCSuite” as connection type. Then run App TRK on the phone, and make sure that the connection type is USB. This can be changed under the Settings menu entry. If necessary, choose Connect from the menu.

On Linux, phone should appear as the /dev/ttyUSB1 device, however if you are running an old kernel, you may need to force the USB module to be loaded correctly before the device will appear:

Note the identifier on the line where your Symbian device appears. Then execute the following, using the first and second part of the identifier in place of XXX, respectively.

For my C5-03, It’s:

The rmmod step may fail if the module is not already loaded, but that is harmless.

In QtCreator, go to Projects –> Targets –> Symbian Device, refresh the serial port, select USB1 and connect to your phone.

qt_symbian_3

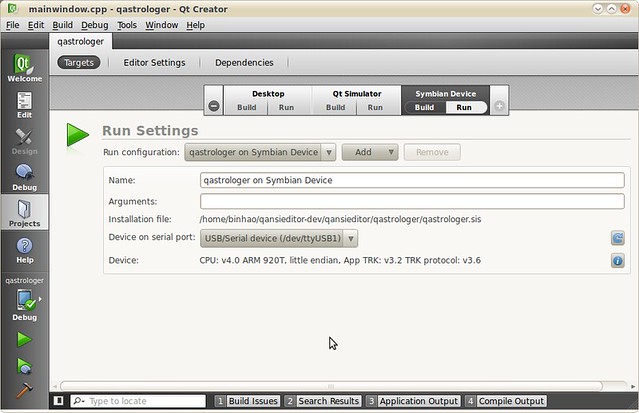
Congratulations! you’ve done. Select Symbian device as your target and click run button. This will package, deploy and run your application on your phone. Simple, Huhhh?

Packaging a Qt Application

    This article applies to Ubuntu 8.04/10.04. I referred to the instruction here: http://ubuntuforums.org/showthread.php?t=51003. And I’ll use my qastrologer project to demo the building procedure.

1. Install build tool packages:

2. Get the source package, exact it into ~/packages/qastrologer. The directory structure should like: ~/packages/qastrologer/qastrologer-<version>/<source>. The <source> directory contains your *.pro file.

3. Add install section in *.pro file. Otherwise, the built package contains not binary:

I referred to the guild here: http://wiki.maemo.org/Packaging_a_Qt_application. For more information on how to use the INSTALLS macro, refer to the Qt document: http://doc.trolltech.com/4.7/qmake-environment-reference.html#installs

4. Run dh_make. This will create the basic debian package structure.

We are generating a single binary package and licensed with GPL. After running the command, a “debian” subdirectory is created. Now we need to fill in more useful infomations.

5. “rules” file:

It is the most important build script. The cdbs already have support for building QMake projects. Our “rules” file is simple:

Last line ensures we use Qt4. I referred to the source of minitube project. You can access it via:

6. “control” file:

This file controls build and binary dependency. For my qastrologer, the default values are enough. You may want to have some minor changes in “Section”/”Priority”/”Maintainer” values. Since I want to keep my package installs from 8.04 to 10.04 and above, I must specify the minimum dependencies manually to use Qt 4.3. So my “control” file looks like:

Note, the default “control” file uses “${shlibs:Depends}” and “${misc:Depends}” macros to generate binary dependencies automatically. Refer to the man page of debhelper to get more information.

7. Fill in “changelog” and “copyright” files.

8. Build the package:

For full build of the package (build source, deb, clean…) run:

Instead if you have a big package, you can also build only the deb file with:

Speeding up Qt Building

As starting with version 4.4, the size of Qt source grows extremely fast. It take hours or even a entire afternoon to build it with full feature enabled. Since I do not use advanced features like Webkit or Phonon, I always build Qt with them disabled. I will show and explain my configure parameters in 4.3 and 4.6 in both windows and linux build in this article.

Windows Build

v4.3, just disable the qt3support module:

v4.6, more modules are disabled:

Qt4.4 added concurrent, webkit, phonon and xmlpattern code, and the format of help files was changed.

Qt4.5 added the gtkstyle. In configure script, -make and -nomake switch are added. But official support for VC6 and VS2002 were dropped. Actually, VC6 generates incorrect code.

Qt4.6 added javascriptcore backend for QtScript module. So I added the “-no-script” switch.

Maybe you have noted, there’s no “-no-make” switch exists before Qt4.5. So, how to exclude building of demos and examples? I looked into the v4.5 source code of configure.exe(located in $QTSRC/tools/configure), and found all “no-make” parts are just excluded by writing to a .qmake.cache file. After running configure, the .qmake.cache file may have a line like:

Now just keep the first 2 entries.

Linux Build

From v4.6, there’s only one all-in-one source package, no separate platform-specific source packages are provided. I firstly chose the qt-everywhere-opensource-src-4.6.3.zip. But even its configure script did not run. Finally, I found it’s a line ending issue, and we need to convert it first using dos2unix utility.

Now convert line endings:

The first 3 lines ensure running of configure script. The last line ensures correct generation of makefiles. Without it, no separated debug info are generated and you may also encounter errors when linking the assistant application as described in QTBUG-5471. The qt-everywhere-opensource-src-4.6.3.tar.gz with *nix line endings does not need above steps and may have less undiscovered build issues.

I’ve tested this approach under Hardy(Ubuntu8.04) and Lucid(Ubuntu10.04). Under Lucid, the dos2unix/unix2dos utility seems to be renamed to fromdos/todos. Just replace the command name.

We can configure it now:

v4.3, as easy as windows:

v4.6, we do not have s60 and gesture switches:

After running configure, modify the .qmake.cache file to remove unnecessary entries.

Patching QTerm

Long time no post here. Recently, I reported 3 bugs to QTerm project and patches were provided. This is my first time to contribute an open-source project.

Then I was able to build my private patched debian package of QTerm with the guide here. I just use the official debian package meta info found in this mirror site. Some notes to take:
1. The path should be like: /home/<your_name>/packages/<your_project>/
2. Before running “dpkg-buildpackage -rfakeroot”, check the debian/control file to see what packages is required to build.
3. The revision of package seems to be controlled by debian/changelog.

My private build file can be found in my skydrive:
– For Hardy(8.04): QTerm 0.5.7
– For Lucid(10.04): QTerm 0.5.11

Hacking QTerm

I read source code in QTerm and FQTerm today. Since I want to find reference for Ascii rendering control in my QAnsiEditor project. After hours of tracing and debugging, I was able to use the rendering control in simplest code. Here’s the patch in src/main.cpp:

The screenshot of standalone mode:

qterm057_1

The complete patch and patched source can be found here:

http://cid-481cbe104492a3af.office.live.com/browse.aspx/share/dev/QAnsiEditor

2 Projects on Google Code

1. QSkin: http://code.google.com/p/qskin/
QSkin is a framework for easier skinning Windows GUI applications. It uses hook technologies, so applications can apply a skin with almost no changes.
The initial ‘Q’ comes from my last name. 🙂

2. QAnsiEditor: http://code.google.com/p/qansieditor/
QAnsiEditor is a program to edit Ansi graphics. It aims to run on multiple platforms base on Qt library.

I will start to code the 2nd project first. Hope I can update it daily.
Release early, release often. =.=

Using Ubuntu Debug Packages in GDB (2)

From last blog, I’ve demostrated the usage of Ubuntu *-dbg packages. However, not all *-dbg packages seem to work as libssl0.9.8-dbg. For instance, libcurl3-dbg and libqt4-dbg packages do not work. I’m afraid some debug info are missing in these two packages. I’m not sure.

I googled a lot, but was not able to find a solution. So I decided to build the debug version of the two library myself. Here are steps for libcurl:

After all, the compiled binary is located in /home/gonwan/testgdb/curl-7.19.7/lib/.libs/. Note, this is a hidden folder.

Here comes our test code:

Build commands:

I use /usr/lib/libcurl.so.4 instead of lcurl, since lcurl will link the binary to /usr/lib/libcurl-gnutls.so.4. But I currently cannot afford it :(. Last, start our GDB:

It prints the backtrace now, though I’m not so accustomed to console debugging. I add the LD_LIBRARY_PATH environment to let our test program find our homemade version of libcurl.so.4. In fact, we can run ldd like following lines. You see the re-direction?

Later, I successfully made it possible to debug Qt source code in IDE. I chose QtCreator, since it has both windows and linux version, and it’s easy to install and configure. I also built my homemade version of Qt:

I only built the most common modules, excluding webkit, script, xmlpatterns, phonon, multimedia and declarative modules. It took only 25 minutes to finish (An entire build under windows may take 3 – 4 hours.). After all, start your QtCreator, create a Qt console project with the source below:

Build the project in debug mode. And now, here’s the magic: Go to Project tab –> Run Settings –> Run Environment, append our homemade Qt library path to LD_LIBRARY_PATH. In my example, it’s /home/gonwan/testgdb/qt4-x11-4.6.2/lib. Ok, you’re almost done! Go back to the Edit tab, set a breakpoint at line 4 (or line 3 as you like), press F5 to start debugging the project. Then continue pressing F11, you will find GDB has stepped into Qt source code! Let me take a screenshot:

qtcreator_qt4debug

In order to load our homemade *.so, we can also run “make install”.

整理了一下Qt 的coding convention

开门见山, 我就直接罗列了, 主要是naming convention, style convention 的话, 私以为自己还不错, 就不参考了.

0. General:
a) 命名要有意义.
b) 命名要一致. 比如不要先用prev, 然后用previous.
c) 命名尽量不要缩写. 超过2 个字母, 第一个字母大写其余小写; 只有2 个字母的则全部大写.

1. Class:
a) 类名: 单词首字母大写, 以Q 为首字母.
b) 成员变量: 除了第一个单词, 其余首字母大写.
c) 成员函数: 同上.
d) 静态成员: 同上.
e) 接口: Qt 似乎除了plugin 相关, 不太用接口(纯抽象类). 一般以QXxxInterface, QXxxPlugin 来命名.

2. 结构:
a) 命名跟类一样, 没有特别的convention.
b) 公有的结构以Q 为首字母. 如果是嵌套的, 似乎没有规律.

3. 枚举:
a) 命名跟类一样, 没有特别的convention.
b) 与类相关的枚举可以定义在类中, 这样可以用类名作为前缀.
c) 公有枚举放到公共的名字空间中. 类, 结构, 接口不放到这个名字空间.
d) 命名体现枚举值的相关性. 比如Qt::CaseInsensitive, Qt::CaseSensitive.
e) 尽量用枚举作为Flag 使用. Qt 中有QFlag, QFlags 两个类作为辅助.

5. 函数:
a) 全局函数: qXxxXxx. 比如qFill, qBinaryFind.

6. 宏:
a) 全部大写, 下划线分隔.
b) static const 的全局变量同上.

7. PS:
a) 编辑器的文本编码最好设成ascii, 这样就保证不会出现中文之类了.
b) 函数的参数, Qt 推荐使用指针, 而不是引用, 因为能显式说明参数会被修改.
c) 头文件include 的顺序, 越是specilized 的放在前面, 越是general 的越放在后面.

Qt 的coding convention 跟Java 的非常像. 私以为加上匈牙利命名法会更好一些. 其实又参考了wxWidgets 的部分代码, 由于它不用命名空间, 所以枚举的命名有些小不一样.

参考:
Designing Qt-Style C++ APIs
Qt – CodingConventions
Qt – CodingStyle

Transparency & Translucency in Qt 4.5

今天开始, 所有的技术文尽量全部用e 文! @@

I don’t really know the exact difference between “transparency” and “translucency”. But the flowing pictures of my running application may show you.

Pic-1 shows a normal dialog with gradient background filled. Pic-2 add opacity ability to the whole dialog(transparent). While Pic-3 only add opacity to the dialog’s background(per-pixel, translucency).

If you’re using windows sdk, there’s an API called “SetLayeredWindowAttributes” to realize the function in Pic-2. You can also call it with a transparency color key to make all pixels of this color to be transparent. But, how to realize the function in Pic-3? My dialog’s background is in gradient color. As mentioned here(in Chinese): To realize it, you must use an API called “UpdateLayeredWindow”. And it’s quite troublesome.

There are also GUI libraries to fill this requirements: 1) WPF, 2) Qt. My application is written in Qt. How do WPF and Qt implement this feature? By drawing all controls themselves. They do not use native windows controls. So if you do it yourself, what a big project !

Using Qt, I call QWidget::setWindowOpacity() to set whole transparency of a window(Pic-2). Qt 4.5 is just released. There’s a new translucency attribute in QWidget class. I use it to realize per-pixel alpha blending(Pic-3). Here’s Sample code:

The demo project can be found here. Note:
a) Make sure you have Qt 4.5 installed to build the project.
b) The translucent window’s type should be set to Qt::FramelessWindowHint.