I used mencoder utility to convert my video files. But it was compiled without libfaac. So if you specify AAC encoding, an error occurs. Details and solutions can be found here. I just added the Medibuntu repository as described:
Modify fps/codec/bitrate values as you wish. The aglobal & vglobal options seem to be essential for iPod.
In order to keep video aspect after scaling, the output file should be 360×204. we use the -vf-add filter to add black band to the top and bottom of it. Other command line options, please refer to its manpage.
Lastly, install gtkpod to import your *.mp4 files.
Updated Mar 27, 2012: The above command line is for iPod Nano. For high quality H264 encoding used in iPod Touch or iPhone, run:
By default, You need to guide Vim to decode double-byte encodings like GBK and Big5. The default Vim configuration only works well with Unicode encodings including utf-8, utf-16, utf-16be etc..Edit your .vimrc file, add line like:
1
set fileencodings=ucs-bom,utf-8,gbk,big5,latin1
Now Vim is able to detect and decode GBK and Big5 encodings automatically. And according my experience, Vim respects utf-16 and utf-16be files only they have BOM byes. Otherwise, these files are wrongly decoded. In this case, you may want to manually reopen the file using a correct encoding. The Vim command like:
1
:e ++enc=<your_encoding>
And Vim does not store BOM when saving by default. To enable/disable BOM saving, use:
1
2
:set bomb
:set nobomb
I’ve attached a series of text files to learn the usage. These text file all contains string “123你好”, but saved in different encodings. Let’s list their code points first:
The objective of this article is to make Vim your programmer’s editor.
First, a normal version of Vim should be installed to enable syntax highlighting. The default installation of Ubuntu 10.04 only contains a compact version “vim-tiny”:
1
# sudo apt-get install vim
Then copy a local vim configure file:
1
2
# cp /etc/vim/vimrc ~/.vimrc
# vi ~/.vimrc
1. Line Number
Add line into the .vimrc file:
1
set number
A similar command can be used to show/hide line number when editing on the fly:
1
2
:set number
:set nonumber
Related help:
1
2
:help set
:help 'number'
2. Tab-space Conversion
From the Vim help:
'tabstop' 'ts'          number  (default 8)
                        local to buffer
        Number of spaces that a  in the file counts for.  Also see
        |:retab| command, and 'softtabstop' option.

        Note: Setting 'tabstop' to any other value than 8 can make your file
        appear wrong in many places (e.g., when printing it).

        There are four main ways to use tabs in Vim:
        1. Always keep 'tabstop' at 8, set 'softtabstop' and 'shiftwidth' to 4
           (or 3 or whatever you prefer) and use 'noexpandtab'.  Then Vim
           will use a mix of tabs and spaces, but typing  and  will
           behave like a tab appears every 4 (or 3) characters.
        2. Set 'tabstop' and 'shiftwidth' to whatever you prefer and use
           'expandtab'.  This way you will always insert spaces.  The
           formatting will never be messed up when 'tabstop' is changed.
        3. Set 'tabstop' and 'shiftwidth' to whatever you prefer and use a
           |modeline| to set these values when editing the file again.  Only
           works when using Vim to edit the file.
        4. Always set 'tabstop' and 'shiftwidth' to the same value, and
           'noexpandtab'.  This should then work (for initial indents only)
           for any tabstop setting that people use.  It might be nice to have
           tabs after the first non-blank inserted as spaces if you do this
           though.  Otherwise aligned comments will be wrong when 'tabstop' is
           changed.
I will choose to use the 2nd approach, so add:
1
2
3
set expandtab
set tabstop=4
set shiftwidth=4
The auto-indent feature is also useful:
1
set autoindent
When setting expandtab, a real tab can be input by <Ctrl-v>_<Tab>
Related help:
1
2
3
4
5
:help autoindent
:help expandtab
:help tabstop
:help shiftwidth
:help retab
3. Option ‘modeline’:
If you start editing a new file, and the ‘modeline’ option is on, a number of lines at the beginning and end of the file are checked for modelines. This is simply enabled by adding:
1
set modeline
Your C/C++ comment may look like one of the following:
C++
1
2
/* vi: set ai ts=4 sw=4: */
/* vim: set ai et ts=4 sw=4: */
And likely, the Python comments:
Python
1
2
# vi: set ai ts=4 sw=4:
# vim: set ai et ts=4 sw=4:
Here, ai, et, ts and sw are just abbreviations. And expandtab is an option only in Vim, not Vi.
Read related help by typing:
1
:help modeline
4. Using Taglist:
There are lots of useful scripts in the Vim website that we can use. But Actually, Ubuntu repository also has some of them included:
After installation, these scripts are just downloaded, but not installed for your Vim. We list available script by typing:
1
# vim-addons
Output on Lucid 10.04:
1
2
3
4
5
6
7
8
9
10
11
12
13
14
15
16
17
18
19
20
21
22
23
24
25
26
27
28
29
30
31
32
33
34
35
36
# Name User Status System Status
align removed removed
alternate removed removed
bufexplorer removed removed
calendar removed removed
closetag removed removed
colors sampler pack removed removed
detectindent removed removed
doxygen-toolkit removed removed
editexisting removed removed
enhanced-commentify removed removed
gnupg removed removed
info removed removed
justify removed removed
lbdbq removed removed
markdown-syntax removed removed
matchit removed removed
minibufexplorer removed removed
nerd-commenter removed removed
omnicppcomplete removed removed
po removed removed
project removed removed
python-indent removed removed
secure-modelines removed removed
snippetsEmu removed removed
sokoban removed removed
supertab removed removed
surround removed removed
taglist removed removed
tetris removed removed
utl removed removed
vcscommand removed removed
vimplate removed removed
whatdomain removed removed
winmanager removed removed
xmledit removed removed
The Taglist plugin is described here, while OmniCppComplete plugin in next section. Both of them make use of ctags utility. Install it first:
1
# sudo apt-get install exuberant-ctags
Now install the Taglist plugin to your Vim:
1
# vim-addons install taglist
When editing a supported file type, Show the taglist window can be opened by one of the following:
1
2
3
:Tlist
:TlistOpen
:TlistToggle
Move your cursor between windows by <Ctrl-w>_w as usual. You may want to add a shortcut to toggle this feature. Add lines to your .vimrc file per official document:
1
2
nnoremap <silent> <F5> :TlistUpdate<CR>
nnoremap <silent> <F6> :TlistToggle<CR>
When your cursor hovers on a function, <Ctrl-]> takes you to its declaration, while <Ctrl-t> takes you back.
More help:
1
2
:help taglist-using
:help taglist-options
5. Using OmniCppComplete:
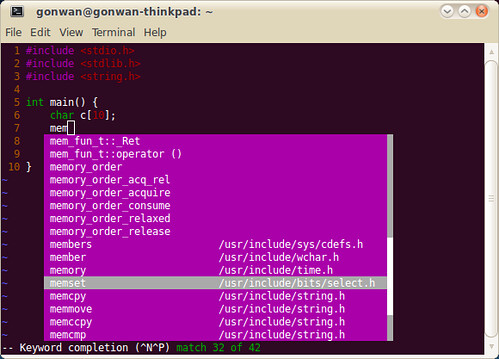
Vim include basic support for code completion. The simplest way is to use <Ctrl-p>. Vim will search your include headers and do insertion. See the screenshot:
The include search path can be set by:
1
:set path <your_path>
More help info:
1
2
:help 'complete'
:help ins-completion
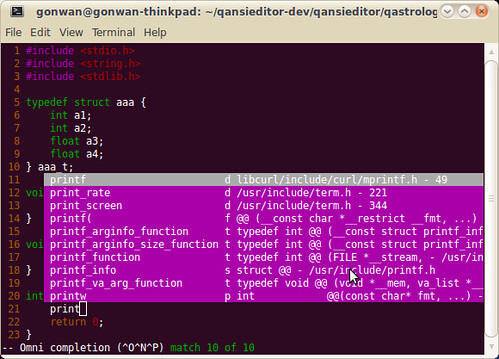
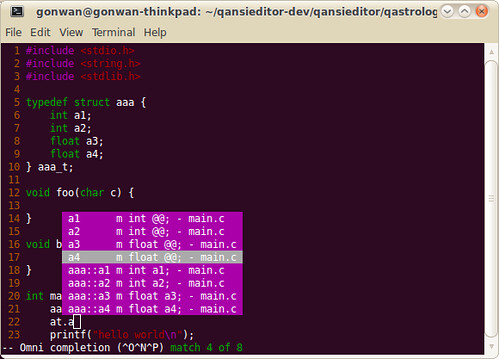
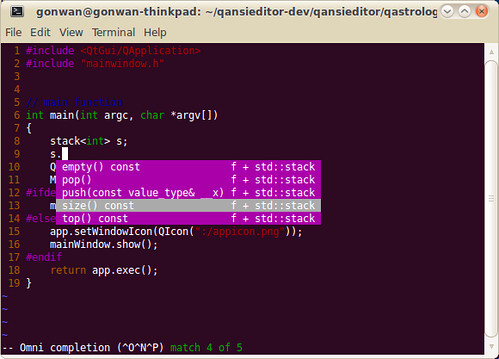
Next, Vim provides basic C language completion using ctags. No C++ is supported. Additional languages script can be found in Vim’s autoload directory, say /usr/share/vim/vim72/autoload. But you should generate necessary ctags index files first. For libc6 header files:
let OmniCpp_ShowPrototypeInAbbr = 1 " function parameters
let OmniCpp_MayCompleteScope = 1 " autocomplete after ::
let OmniCpp_DefaultNamespaces = ["std", "_GLIBCXX_STD"] " see :help omnicpp-faq
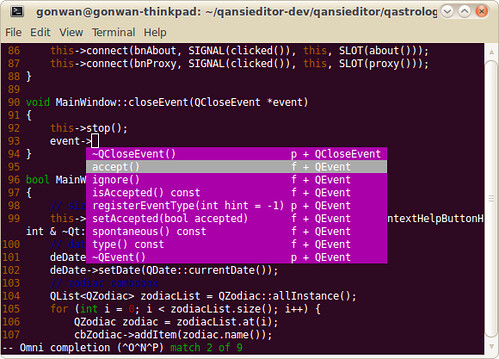
You may encounter problems when completing STL functions. Refer to :help omnicpp-faq and find the solution. Anyway, it works all good for me. Here’re screenshots showing STL and Qt code completion:
!!!NOTE!!! : The tags file for current file must be generated for OmniCppComplete to work. I’ve set Ctrl+F12 as the accelerate key. Otherwise, you’ll get “Pattern not found” error. More help:
1
2
:help omnicpp-options
:help omnicpp-features
Finally, the list of lines adding to my .vimrc file:
Got a new EeePC 1015PX this week. I just installed the netbook version of Ubuntu 10.04.2 and all devices are recognized. Only some small tweaks are needed:
1. Add the partner repository
Go to System –> Administration –> Software Sources –> Other Softwares tab, check the partner repository. Then software like Sun’s JDK and Skype become available. Skype works fine with my webcam.
2. Tweak asus hotkeys
The volume and wireless hotkeys do not function by default. Here’s the official solution in wiki.
1
# sudo vi /etc/default/grub
Find GRUB_CMDLINE_LINUX_DEFAULT parameter and modify it as follow:
Then update grub installation with the command and reboot:
1
# sudo update-grub
Update Feb 17, 2012: acpi_backlight=vendor dims initial screen brightness, and make it difficult to adjust it later. Now I use acpi_backlight=video to avoid this.
3. Disable touchpad
It’s necessary to disable the touchpad while typing. It annoying because it’s always mis-clicked and cause input focus to move away. Many threads in forums discussed about this, but none works for me. The .32 kernel just recognizes the touchpad as a mouse, thus cannot be disabled. Then I just install the .35 kernel in the backport repository:
The touchpad finally recognized correctly. Then continue installation:
1
# sudo apt-get install gsynaptics
Go to Preference –> Touchpad, uncheck “Enable touchpad”.
Go to Preference –> Mouse –> Touchpad tab, uncheck “Disable touchpad while typing”. If this option is not disabled, your touchpad will be enabled after you type something.
Update Jul 15, 2011: Newer .32 kernels from 2.6.32-33 recognize the touchpad correctly. So if you use later versions or fresh install your ubuntu from 10.04.3, there’s no need to install .35 kernel.
4. Autohide top panel
I installed the netbook UI by:
1
# sudo apt-get install ubuntu-netbook
There’s no autohide property in the context menu of top panel of the UI. I had to modify it manually:
Too small content area in firefox by default. To hide bookmark bar, just find and uncheck the option in View menu. To hide menu bar, you need to install an extension called “Compact Menu 2”. It compacts the whole menu as a single button in navigation bar. In addition, you may also want to disable the “webfav” extension to make room.
6. Adjust screen panning
Some application is not netbook-friendly. Their windows are just to large, even beyond 1024×600. To view the whole window, you can set the logic resolution of your screen. And it scrolls when your mouse pointer reaches the border of the physical screen. First, find the output of your screen by:
1
# xrandr -q
The current output name may be VGA*, LVDS* or else. Then change your logic resolution of it like:
1
2
# xrandr --output LVDS1 --panning 1280x800
# xrandr --output LVDS1 --panning 1024x600
7. Tweak startup applications
Go to System –> Preferences –> Startup Applications, uncheck unnecessary items. For me, they are:
Evolution Mail Notifier (unused)
Print Queue Applet (unused)
Visual Assistance (unused)
Bluetooth Manager (no bluetooth device)
Maximus Window Management (no need to the feature)
8. Make Vim your text reader
I read novels in text files, I want to keep track of the last reading position automatically.
1
2
# cp /etc/vim/vimrc ~/.vimrc
# vi ~/.vimrc
Search and uncomment the line as guided:
1
2
3
4
5
" Uncomment the following to have Vim jump to the last position when
" reopening a file
if has("autocmd")
au BufReadPost * if line("'\"") > 1 && line("'\"") <= line("$") | exe "normal! g'\"" | endif
endif
9. Switch between gcc versions
Sometimes, a specific version of gcc/g++ is needed to build a project. I simplify this by making use of the “update-alternative” utility. Suppose you have installed gcc-4.1 and gcc-4.4:
In previous articles, I was not able to use Qt’s debug package provided by Ubuntu. Now, I will explain how to use them.
Our simple application:
C++
1
2
3
4
5
6
7
// main.cpp
#include <QtCore/QString>
intmain(){
QStrings="1234567";
inti=s.indexOf('3');
returni!=2;
}
Our *.pro file, you should enable the debug build:
1
2
3
4
5
6
# DebugQt.pro
TARGET = DebugQt
TEMPLATE = app
SOURCES += main.cpp
QT -= gui
CONFIG += console debug_and_release
1. Build your debug version of application:
1
2
# qmake-qt4
# make debug
2. Install Qt’s debug package:
1
# sudo apt-get install libqt4-debug
3. Install the Qt source:
1
# sudo apt-get source libqt4-debug
Now you can start debugging your application. Since Qt’s debug symbols are installed in /usr/lib, It does not follow the GDB’s global debug directory described here. We should tell GDB to load these symbols manually:
We set a breakpoint at the beginning of main function to load all shared libraries. Next, we will load symbols for libQtCore.so.4. The symbol will be loaded in the start address of it (0xb7652510):
2. Get the source package, exact it into ~/packages/qastrologer. The directory structure should like: ~/packages/qastrologer/qastrologer-<version>/<source>. The <source> directory contains your *.pro file.
3. Add install section in *.pro file. Otherwise, the built package contains not binary:
4. Run dh_make. This will create the basic debian package structure.
1
# dh_make -s -c gpl --createorig
We are generating a single binary package and licensed with GPL. After running the command, a “debian” subdirectory is created. Now we need to fill in more useful infomations.
5. “rules” file:
It is the most important build script. The cdbs already have support for building QMake projects. Our “rules” file is simple:
1
2
3
4
5
6
#!/usr/bin/make -f
include /usr/share/cdbs/1/rules/debhelper.mk
include /usr/share/cdbs/1/class/qmake.mk
QMAKE = qmake-qt4
Last line ensures we use Qt4. I referred to the source of minitube project. You can access it via:
1
# sudo apt-get source minitube
6. “control” file:
This file controls build and binary dependency. For my qastrologer, the default values are enough. You may want to have some minor changes in “Section”/”Priority”/”Maintainer” values. Since I want to keep my package installs from 8.04 to 10.04 and above, I must specify the minimum dependencies manually to use Qt 4.3. So my “control” file looks like:
Simple application to get astrologer information from sina.tw.
Note, the default “control” file uses “${shlibs:Depends}” and “${misc:Depends}” macros to generate binary dependencies automatically. Refer to the man page of debhelper to get more information.
7. Fill in “changelog” and “copyright” files.
8. Build the package:
For full build of the package (build source, deb, clean…) run:
1
# dpkg-buildpackage -rfakeroot
Instead if you have a big package, you can also build only the deb file with:
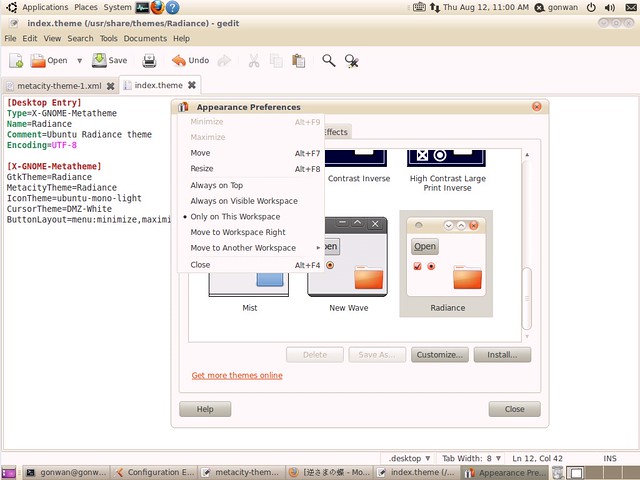
This will set your window button order. And every time you switch to “Radiance” theme, no confirm dialog will prompt to tell that the button order will be changed. Then:
Search “menu_focused_normal”, there are four lines regarding graphics drawing of menu: “menu_focused_normal”, “menu_focused_prelight”, “menu_unfocused_prelight”, “menu_unfocused_prelight”. Add first line into “menu_focused_*” and remove the image tag, and use second line to replace the image tag in “menu_unfocused_*” too.
In company, I use VNC to control remote machines. But in GDM stage, this does not work. Maybe VNC server in Ubuntu is a service in Gnome session. The solution is to use XDMCP(X Display Manager Control Protocol). Using Ubuntu, “xnest” package should be installed on both server and client side. It’s a nested X server that simply relays all its requests to another X server, where it runs as a client:
1
# sudo apt-get install xnest
In server side, go to System –> Administration –> Login Window, or simply run “gdmsetup”. Go to “Remote” tab, set value to “Same as Local”.
In client side, go to Applications –> Internet –> Terminal Server Client, or simply run “tsclient”. You’ll find the XDMCP protocol type can be selected now. Enter your server address to connect.
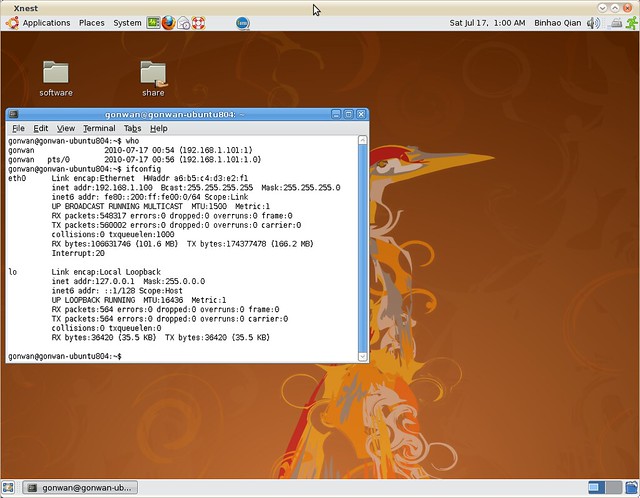
Here’s my screenshot. The output of command “who” and “ifconfig” had different IP addresses:
Since xnest sends and receive all X Server data, it consumes a lot of bandwith. On my laptop using wireless networking, it’s somewhat slow.
I installed Cairo-Dock when installing Lucid. And it automatically enabled some desktop effects. Nowadays, I found these effects make my desktop less responsive. So, I decided to turn off them. First, I thought they were compiz effects. I was wrong. Actually, they are metacity compositing effects and come with gnome 2.22 and later versions.
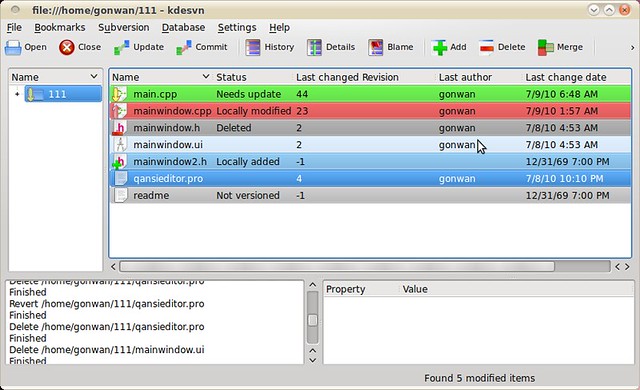
Since I chose SVN as my VCS in google code, a SVN GUI client may be helpful. I found kdesvn. It’s free, powerful, and just there in the Ubuntu repository:
1
2
# sudo apt-get install kdesvn
# sudo apt-get install konqueror
The 2nd line is used to fix the bookmark issue in kdesvn :).
Then invoke the line below first:
1
# svn help
This will create a default configuration directory for SVN in ~/.subversion/. In fact, any SVN command will do. There are configuration files located in /etc/subversion/. But they seems to be of no use.
Note, kdesvn will use SVN configuration files when perform operations. Now, we need to edit them.
1. Proxy
1
# gedit ~/.subversion/servers &
Uncomment and modify the following lines in [global] section:
1
2
http-proxy-host = <your_http_proxy_host>
http-proxy-port = <your_http_proxy_port>
It seems that we can use separate settings for different host groups. This is not verified, leaves to you.
2. Password
SVN 1.6 added gnome/gnome-keyring and kde/kwallet credentials management support. Some additional options were introduced.
2.1 SVN 1.4.6 (Ubuntu 8.04, Hardy)
1
# gedit ~/.subversion/config &
Uncomment and modify the following lines in [auth] section:
1
2
store-passwords = no
store-auth-creds = no
You’re done. The 1st option prevents SVN from saving plain-text password locally. The 2nd even stops caching the credentials. Then every time you need an SVN authentication, a prompt appears.
Note: you cannot find an option in kdesvn’s configuration to set a user/password values. The application just use cached key values in ~/.subversion/auth/ directory.
2.2 SVN 1.6.6 (Ubuntu 10.04, Lucid)
If you do not want to save password, set the 2 values as that in Hardy. But they are deprecated and moved to ~/.subversion/servers.
1
# gedit ~/.subversion/servers &
Uncomment and modify the following lines in [global] section:
1
2
store-passwords = no
store-auth-creds = no
Then the ~/.subversion/config file:
1
# gedit ~/.subversion/config &
Uncomment and modify the following lines in [auth] section. Set to empty:
1
password-stores =
You’re done! All SVN behaviors are consistent with that in Hardy.
If you want to integrate with gnome-keyring or kwallet, modify the line to contain “gnome-keyring”, “kwallet” or both. Gnome-keyring does not integrate well with SVN, so I chose kwallet and have a test.
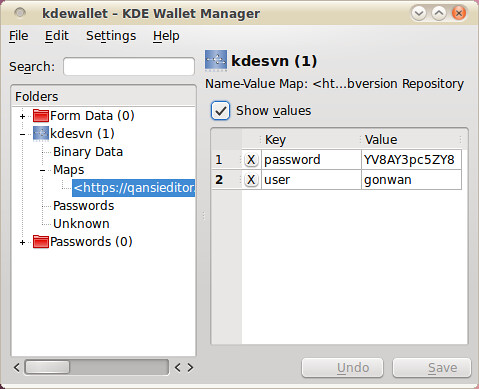
In kdesvn, go to Settings –> Configure Kdesvn –> Subversion, check the “Store passwords into KDE Kwallet” option. It’s the default configuration. Make sure that the option and the “password-stores” value are consistent. Otherwise, our kdesvn fail to commit code. When a kdesvn prompts to ask for username/password, check “Store password (into KDE Wallet)” option. Then you can view your saved login information in KWallet Manager application: