Using Ubuntu Debug Packages in GDB (2)

From last blog, I’ve demostrated the usage of Ubuntu *-dbg packages. However, not all *-dbg packages seem to work as libssl0.9.8-dbg. For instance, libcurl3-dbg and libqt4-dbg packages do not work. I’m afraid some debug info are missing in these two packages. I’m not sure.

I googled a lot, but was not able to find a solution. So I decided to build the debug version of the two library myself. Here are steps for libcurl:

After all, the compiled binary is located in /home/gonwan/testgdb/curl-7.19.7/lib/.libs/. Note, this is a hidden folder.

Here comes our test code:

Build commands:

I use /usr/lib/libcurl.so.4 instead of lcurl, since lcurl will link the binary to /usr/lib/libcurl-gnutls.so.4. But I currently cannot afford it :(. Last, start our GDB:

It prints the backtrace now, though I’m not so accustomed to console debugging. I add the LD_LIBRARY_PATH environment to let our test program find our homemade version of libcurl.so.4. In fact, we can run ldd like following lines. You see the re-direction?

Later, I successfully made it possible to debug Qt source code in IDE. I chose QtCreator, since it has both windows and linux version, and it’s easy to install and configure. I also built my homemade version of Qt:

I only built the most common modules, excluding webkit, script, xmlpatterns, phonon, multimedia and declarative modules. It took only 25 minutes to finish (An entire build under windows may take 3 – 4 hours.). After all, start your QtCreator, create a Qt console project with the source below:

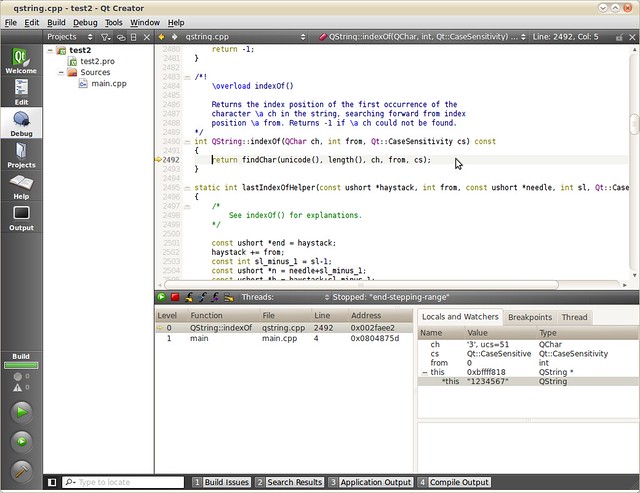
Build the project in debug mode. And now, here’s the magic: Go to Project tab –> Run Settings –> Run Environment, append our homemade Qt library path to LD_LIBRARY_PATH. In my example, it’s /home/gonwan/testgdb/qt4-x11-4.6.2/lib. Ok, you’re almost done! Go back to the Edit tab, set a breakpoint at line 4 (or line 3 as you like), press F5 to start debugging the project. Then continue pressing F11, you will find GDB has stepped into Qt source code! Let me take a screenshot:

qtcreator_qt4debug

In order to load our homemade *.so, we can also run “make install”.

Using Ubuntu Debug Packages in GDB

I will use openssl library as example. Here’s a simplest source:

Now build and start your GDB, note the ‘-g’ option is necessary:

GDB cannot step into openssl source code, since there’s no debug symbol found. In Ubuntu, we can install it using apt-get. I’m using Hardy(8.04):

Launch our GDB again:

Symbols are found, GDB prompt for missing source files! We can install by typing:

The source files will be downloaded and extracted in openssl-0.9.8g folder. Now we wanna attach the source files when debugging.

Oh! Everything works!

Compact Gnome Theme in Hardy

Refer to: http://martin.ankerl.com/2008/10/10/how-to-make-a-compact-gnome-theme/

I chosen the Glossy theme and made a compact one. I tried to make smallest changes and it was enough.

Modify the name and comments, save.

Add the following line:

Ok, now let’s compare the result:

theme_glossy

theme_glossy_compact

Updating Kernel in Lucid (3)

Today, I built the mainline kernel v2.6.33.4 on Lucid. Most instruments were taken from here: https://wiki.ubuntu.com/KernelTeam/GitKernelBuild:

1. Unpack:

2. Config:

The last line is optional. The wiki said:

Note that Ubuntu kernels build with debugging information on, which makes the resulting kernel modules (*.ko files) much larger than they would otherwise be (linux-image*.deb will be 200-300 MB instead of 20-30 MB). To turn this off, go into “Kernel hacking”; then, under “Kernel debugging”, turn off “Compile the kernel with debug info”.

It’s outdated maybe. When building kernel 2.6.24.x in Hardy, It WAS 200-300MB. But in Lucid, it is always 20-30MB. When you turn off the option, the build process took 80min instead of 100min, and 800MB instead of 5G storage. The option is configured by “CONFIG_DEBUG_KERNEL” in .config file.

3. Build:

After all, two files were generated. It contains 2772 modules. You may find the usage of “–append-to-version” and “–revision” options here:
*) linux-headers-2.6.33.4-custom_2.6.33.4-1_i386.deb
*) linux-image-2.6.33.4-custom_2.6.33.4-1_i386.deb

4. Install:

The last 2 lines are NOT mentioned in the wiki. They are used to generate the initrd image in Lucid. The build also do not generate abi and vmcoreinfo files in /boot.

5. Reference:

http://ubuntuforums.org/showthread.php?p=9120942

Updating Kernel in Lucid (2)

It seems a little easier when building Lucid kernel from ubuntu source.

1. Tools:

2. Sources:

3. Customize:

cd into “linux-2.6.32” root.

I selected “core2” as my custom name.

Then patch some files:

*) debian.master/etc/getabis:
From: getall i386 generic generic-pae 386
To: getall i386 generic generic-pae 386 core2

*) debian.master/rules.d/i386.mk:
From: flavours = generic generic-pae 386
To: flavours = generic generic-pae 386 core2

Now, edit the config file. You will have to go through all the flavors for this script to work properly:

You should not make changes to any of the configurations until you see the core2 configuration:

I disabled the “Kernel hacking ==> Kernel debugging” feature to accelerate build process. If you got the error like:

Simply add the x permission to all scripts, it’s a known bug:

4. Build:

If you got the error like:

Add option “skipmodule=true” to the last command line. If you got:

Add option “no_dumpfile=true” to the last command line. And there will be no vmcoreinfo-2.6.32-22-core2 file.

5. Done:

I found that Lucid has 2675 driver modules while Hardy has only 1921. It seems the kernel was greatly enhanced between the two releases.

My T60 has a Duo Core 1.83G CPU. It took about 90 minutes to finish. The kernel also consumed about 4G storage T.T. After all, two *.deb files were generated:
*) linux-headers-2.6.32-22-core2_2.6.32-22.33_i386.deb
*) linux-image-2.6.32-22-core2_2.6.32-22.33_i386.deb

6. Others:

Since the build process used so much storage, I was monitor my available disk space from time to time using “df” utility. I found the “free space” is about 500M larger than “available space”. What happened? Then I found the answer here: http://ubuntuforums.org/showthread.php?t=328786&page=3
. We can use “tune2fs” utility to set the size of reserved space:

Set the percentage of the filesystem which may only be allocated by privileged processes. Reserving some number of filesystem blocks for use by privileged processes is done to avoid filesystem fragmentation, and to allow system daemons, such as syslogd(8), to continue to function correctly after non-privileged processes are prevented from writing to the filesystem. Normally, the default percentage of reserved blocks is 5%.

7. Reference:
https://help.ubuntu.com/community/Kernel/Compile
http://blog.avirtualhome.com/2010/05/05/how-to-compile-a-ubuntu-lucid-kernel/

Updating Kernel in Hardy

Hardy(8.04) is a little different from all the other versions when building a kernel. Only Hardy has two packages for kernel installation: linux-image, linux-ubuntu-modules. If you do not install the latter one, your sound card and network card will can not be recognized.
Today, I built the kernel from the ubuntu source(not the original kernel source). So, I could use the including debian scripts for convenience. Here’s the steps:

1. Tools:

2. Sources:

The source will be downloaded in the current directory.

3. Customize:

cd into “linux-2.6.24” root.

I selected “core2” as my custom name.

Then patch some files:

*) debian/scripts/misc/getabis:
From: getall i386 386 generic server virtual
To: getall i386 386 generic server virtual core2

*) debian/rules.d/i386.mk:
From: flavours = 386 generic
To: flavours = 386 generic core2

4. Build:

If you get errors like:

Run the following command, it is issued by the Makefile:

5. Done:

My PC has a P4-2.6c CPU. It took about 90 minutes to finish. The kernel also consumed about 2G storage. After all, three *.deb files were generated:
*) linux-headers-2.6.24-27-core2_2.6.24-27.69_i386.deb
*) linux-image-2.6.24-27-core2_2.6.24-27.69_i386.deb
*) linux-image-debug-2.6.24-27-core2_2.6.24-27.69_i386.deb

6. Customize modules:

First, generate prepare scripts:

cd into “linux-ubuntu-modules-2.6.24-2.6.24”

Note: Custom modules name must match the custom kernel name, say “core2”.

Then patch some files:

*) debian/rules.d/i386.mk:
From: flavours = 386 generic
To: flavours = 386 generic core2

*) debian/rules.d/0-common-vars.mk (To prevent error in build step, debian/rules.d/3-udebs.mk):
From: disable_d_i = no
To: disable_d_i = true

Now generate new debian/control, which includes new custom kernel:

7. Build modules:

8. Done again:

This time, it took 30 minutes and consumed 300M storage. Two *.deb files were built:
*) linux-headers-lum-2.6.24-27-core2_2.6.24-27.45_i386.deb
*) linux-ubuntu-modules-2.6.24-27-core2_2.6.24-27.45_i386.deb

9. Install kernel:

Just double-click or install using the dpkg utility. Here’s my screen-shot:

hardy_kernel

10. Reference:

https://help.ubuntu.com/community/Kernel/Compile
http://blog.avirtualhome.com/2009/09/08/how-to-compile-a-kernel-for-ubuntu-jaunty-revised/
http://ubuntuforums.org/showthread.php?t=912322

Ubuntu to Mainline Kernel Version Mapping

I’m now using Ubuntu 10.04 (Lucid Lynx). I want to dig into the kernel. When I check the kernel package in Synaptic, I found the version is 2.6.32-22.33, but currently the mainline kernel version is 2.6.32.13. How could that be?

Then I found the following address: http://kernel.ubuntu.com/~kernel-ppa/info/kernel-version-map.html. There’s a map, and version 2.6.32-22.33 maps to mainline version 2.6.32.11+drm33.2. DRM stands for Direct Rendering Manager. It’s a backport module from 2.6.33 to provide video acceleration.

To further verify the version, I install the linux-source package. In /usr/src/linux-source-2.6.32.tar.bz2!/linux-source-2.6.32/Makefile:

But it is a modified version. To get the original kernel package, run the command:

There files will be downloaded: linux_2.6.32-22.33.dsc, linux_2.6.32.orig.tar.gz, linux_2.6.32-22.33.diff.gz. *.dsc is a signature, *.orig.tar.gz is the original source, *.diff.gz is the patch. In the case of packages made specifically for ubuntu, the last of these is not downloaded and the first usually won’t have “orig” in the name. In /usr/src/linux-source-2.6.32.orig.tar.gz!/linux-source-2.6.32/Makefile:

And after installed the source, the version number became same as that in the *.deb package.

Installing Ubuntu 10.04 (2)

Some additional words:

Today, I finally reverted to use pidgin instead of emphathy.
There’s a plugin call “musictracker” which displays the “now playing” info.

lucid_pidgin_now_playing

It seems that nickname cannot be changed when using MSN protocol.
I did set the friendly name, but Others cannot see.
And the personal message is called status in pidgin, so set it there.

For QQ protocol, using pidgin may cause activation problem.
An error shows to tell you to activate your account via jihuo.qq.com.
Open the account settings, uncheck the “Connect by TCP” may solve the issue.

I google a lot to find a plugin for rhythmbox to show lyrics automatically.
Though rhythmbox does have a lyrics plugin, it cannot find most Chinese lyrics.
Then I find LrcShow-X. It works well.

lucid_rhythmbox_lyrics

Installing Ubuntu 10.04

Sorry for leaving this blog outdated for so long.
Since go out of GFW is not a so easy task.

There’s something to mention about installation.

0. installation

I installed lucid from harddisk.
There’s an lock issue when modifying the partition table.
We should umount the iso first:

1. grub

The original grub installation will not probe Windows OSes.
See here. So you must do it manually.

2. qterm

The iBus IME issue seems to be fixed in this version.
But the “Home” and “End” key do not work correctly. This is a resolved bug.
So, change the key type to “linux” may workaround.

3. emphathy

Pidgin is replaced with emphathy.
Emphathy is not as powerful as pidgin.
But it integrates better with Gnome’s notification area.

4. totem/rhythmbox

These are video/audio players.
Please install essential codecs.
Otherwise, almost nothing could be played and seek function is not available.

Now, almost all media formats can be played.
Also, media plugins in firefox works.

5. fglrx

This is the graphics driver for ATI cards.
You may experience better performance and effects.
But after I installed it, I could not play Warcraft III using wine.
So I reverted to the original default graphics driver, and it works.
ubuntu1004_warcraft3
To play other 3D games, make sure your have turned off compiz firstly.

6. gimp

The gimp is not installed by defaut, so…

7. acpid

I’m running on a Thinkpad T60 machine.
The brightness function key works correctly, but the volume button does not.
Then I found that the hotkey mask should be enabled:
http://swiss.ubuntuforums.org/showthread.php?t=1328016
http://www.thinkwiki.org/wiki/thinkpad-acpi
After all, I add following line in the startup script, /etc/rc.local:

Then the volume button works.
The play/pause/stop/prev/next buttons also work in rhythmbox.

8. fstab

I want to mount all windows partitions when boot.
So /etc/fstab file should be edited automatically using pysdm:

For ntfs partitions, default option is OK.
For fat32 partitins, add the “utf8=1” string.
Or you may want to edit fstab manually.
You can copy from /etc/mtab file and do some little modification.
For me, the added modified lines are:

9. restricted packages

This will install some other useful packages.
The open-source java packages are included but not necessary.
Unmark them and install sun’s packages instead.

10. modify reserved space

11. ctrl+alt+backspace

See here:
Since Ubuntu 9.04, the Ctrl-Alt-Backspace key combination to force a restart of X is now disabled by default, to eliminate the problem of accidentally triggering the key combination. In addition, the Ctrl-Alt-Backspace option is now configured as an X keymap (XKB) option, replacing the X server “DontZap” option and allowing per-user configuration of this setting.
As a result, enabling or disabling the Ctrl+Alt+Backspace shortcut can now be done easily from the desktop.
– Enabling Ctrl-Alt-Backspace for Ubuntu 10.04
** Select “System” -> “Preferences” -> “Keyboard”.
** Select the “Layouts” tab and click on the “Layout Options” button.
** Select “Key sequence to kill the X server” and enable “Control + Alt + Backspace”.
– Enabling Ctrl-Alt-Backspace for Kubuntu 10.04
** Click on the Application launcher and select “System Settings”.
** Click on “Regional & Language”.
** Select “Keyboard Layout”.
** Click on “Enable keyboard layouts” (in the Layout tab).
** Select the “Advanced” tab. Then select “Key sequence to kill the X server” and enable “Control + Alt + Backspace”.